Creating a Custom Sound Bank
Contents
Contents:So, you want to create custom sound banks? Perhaps you want to create a custom radio call or dialogue for a mission you’re developing. Or, you want to use some custom ambience for an entirely new location! Or better yet, change the background music of the game! In all of these cases, you need to create a custom sound bank. Before we get into the process, I’ll have to mention a couple of things. Also, this tutorial assumes that you have prior knowledge and a good understanding of MGS:V’s file structure, fpk/fpkd files, and the .fox2 (also known as DataSet) files.
- This process is not the same as sound swapping. Sound swapping replaces already existing sounds in the game, whereas custom sound banks let you create entirely new ones, and give you a lot more control.
- Custom sound bank creation will never replace the method of sound swapping. Sound swapping is the recommended method of replacing already existing sounds 99% of the time.
- This tutorial will not specifically mention how to properly create new dialogue, or background music, or ambience. It only shows how to implement a very basic sound. But for all the above cases, the process is at least 85% the same. You will still generate and patch up sound banks the same way, and the process of properly loading the sound bank in the game is also the same. What does differ are some of the steps in creating the various events and how you actually play the sounds in the game. For instance, the game will play dialogue differently than say, ambient sounds.
Now, let’s first clear out what a sound bank even is (skip this next paragraph if you want to get straight to the tutorial).
The Sound Engine of MGS:V
As the name implies, a sound bank is a file that contains all kinds of audio for the game. In the case of MGS:V, all audio is always stored inside an sbp file (sound bank package?). The Phantom Pain specifically contains 215 of these! Those include every audio: weapon sounds, cutscenes, ambience, vehicles, you name it! Now I know what you’re thinking: “How are these sound bank files generated?”. You might think that the answer is very simple: Kojima Productions have programmed their own sound system, with its own tooling for it! But no, that’s not the case, unlike 99% of the file formats of MGS:V. Luckily for us (or unluckily if you want to look at it that way!), Kojima Productions used a very popular audio engine that has been used by many other game developer studios as well. Witcher 3 is one of those games that uses this exact same audio engine. It’s called WWise. Thankfully, there’s a free program with the same name that does just that, create sound banks (which is obviously made by the same company). This is the program that we will use to create our own custom sound banks. The free version has some limitations to it though, but we really don’t have to worry about that right now.
Requirements
So for this process, we’ll need 3 things: WWise 2013, as well as any hex editor program, such as HxD or 010 Editor. Furthermore, you’ll need FoxTool for turning an xml file to a .fox2 and an .sdf.
Another thing you’ll obviously need is the sound file that you want to add to the game. Unfortunately, WWise only likes .wav formats, so if your sound effect isn’t a .wav, you’ll have to convert it to one. This can be done in many ways, such as using Audacity or some online website that does the job automatically. It’s recommended that your sound effect is 16-bit (99% of sounds are already 16-bit, unless you’re porting sounds from some game from the 90’s or before that) and in the range of 44100 or 48000 Hz, since these are the most common frequencies (and they can give you more sound quality than you’ll ever need).
Setting Up WWise
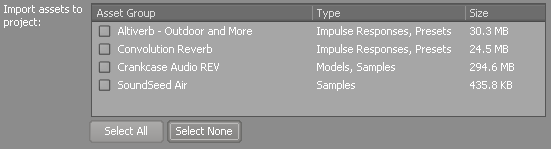
After you’ve done that, it’s time to install & open WWise 2013 (yes, it must be the 2013 version). The first menu that will pop up is the Project Launcher. This is where all of your WWise projects will appear. To create a new project, just click on New and give your project a name. You can also change the location of your project folder if you so wish. Below these options there’s an import assets option that will add some extra presets, effects and models inside your project. These are quite big (heck one of them is 294 MB!) and you really don’t need them, since WWise already has more than you’ll ever need in terms of effects or functionality. It’s recommended to turn them off. Besides, your project files will become huge anyway, so why make it waste even more space?
Finally, create your project by pressing OK. You will now be greeted with this pop up:
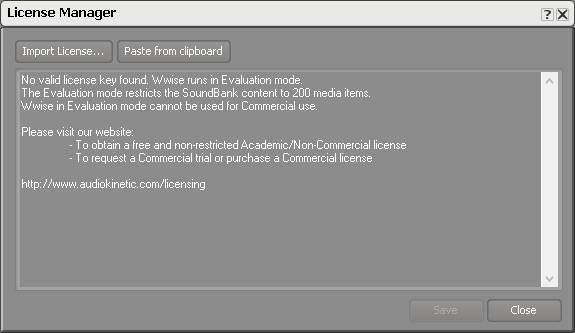
This is the biggest (and the only?) limitation of the free version of WWise. The program will only let you have 200 media items at once. The term “media items” basically refers to any sound file you’ve imported, so can only have 200 of them at all times. This isn’t a huge problem, since you can always just separate your project into many many smaller parts, and then make the game load all of them. But for now, we don’t have to worry about this, so just press on Close.
Now, I can imagine people freaking out when seeing WWise for the first time, with all of its menus & buttons all over the screen.

But no need to worry because for the purposes of this tutorial, we won’t be using 80% of the stuff you see on screen. Just like any program, you get used to it as time goes on. At this point I should also mention that AudioKinetic, the company that created WWise, has a lot of tutorials on YouTube about the many different things you can do with it (including Dialogue and Music).
For this tutorial we’re going to do something very simple: import an audio file, and then create a new event that will activate this audio file so that it can start playing in the game. == Importing Sound Files == Importing an audio file is easy, and can be done in two ways: either by right-clicking on the Default Work Unit of the Actor-Mixer Hierarchy on the top-left and choosing Import Audio Files:

Or just doing a classic drag & drop onto the same Default Work Unit:

If everything went well, you should see your audio file underneath the Default Work Unit. Again, I should mention that WWise only accepts non-8-bit .wav audio. If you want to preview what your sound sounds like, you can either press Space when you have it selected, or go at the bottom of the screen where the Transport Control menu is displayed, and press the play button.
The Sound Property Editor
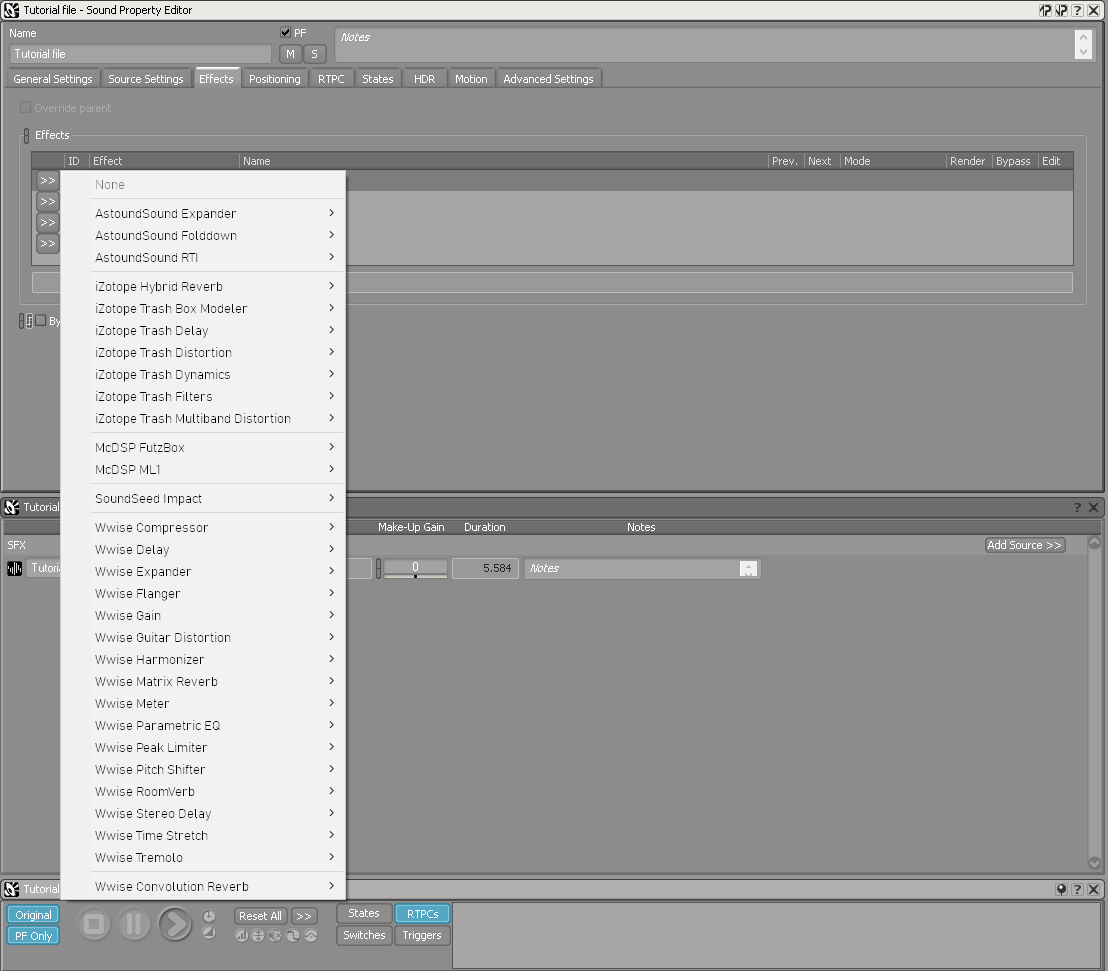
You might have noticed that, once the sound file is selected, a new menu appears at the middle of the screen, called Sound Property Editor.

This is where all of your sound properties are located. Here you can add any effect you can imagine. Low pass filter, high pass filter, pitch, reverb, echo, you name it! The General Settings tab has the usual things like volume, pitch, and low pass filter. There’s also a loop tick box, which has to be enabled if you’re planning on making ambience or perhaps music, so that the sound doesn’t stop after it’s finished. If you want more advanced effects, go to the Effects tab, and play around with all the available effects (there’s a lot of them)!
As you can see, WWise is no joke. There’s a very good reason so many AAA game developer studios use it. Just imagine the amount of time it would’ve taken a studio to program all of this into their own sound engine from scratch! Madness. But unfortunately for us, WWise makes sound modding a major pain, due to the way it’s been designed (the sound banks are only generated one-way, meaning that it’s extremely hard to reverse the process and see how they’ve been created. In other words, you can’t just open an .sbp and see what’s inside it).
Sound Positioning
The Two Positioning Types
Another important setting is the type of positioning of the sound. This can be found in the Positioning tab. WWise 2013 lets us choose between 2 types of sound: 2D and 3D (more recent versions of this software have massively changed how this system works). As you might imagine, 2D is for sound that has no specific direction, so it’s like it’s coming from everywhere. This is what you would expect from music, or radio calls. For environmental sound effects, 3D is usually the better option. We won’t get into all the details for the settings of each one for this tutorial. But I’ll mention the most important bits.
2D Positioning
If you’re using 2D positioning, then the only extra option you can use is Enable Panner, which lets you change the direction that the sound is coming from. This is useful for something like a horror map, where you would want the sound to be heard behind you no matter what!
2D positioning can also be used for ambient sounds. However, since 2D positioning doesn’t have any attenuation, there will be no fade in or fade out effects, so the sound will immediately start playing at full volume when the player is in its radius. This should typically be used for very subtle ambient sounds inside buildings. For things like pipe noises, or machinery, use 3D instead.
3D Positioning
For 3D, the settings are much more complicated, but I’ll keep it short. The Position Source should just be kept at Game-defined, so that they play at the exact position you’ve placed them in FoxKit or as you have defined it in your fox2 sound entity. What you have to watch out for is the Attenuation option! This controls how the sound fades in and out the more you approach it or move away from it, as well as the maximum distance from where it can be heard. If you do not create an Attenuation, then your sound will not have any fade in/out, and the sound will immediately play at full volume when you get close, it won’t sound right. For that reason, you should create one by pressing the >> button (under the Attenuation title) and then clicking on New. Give it a name and click OK. Now you’ll see the Edit… button unlock, which will bring you to the Attenuation Editor menu.
And here we are, we have yet another scary menu with so many settings & buttons! This is a common theme with WWise, so you should get used to seeing this.

But once again, it’s not too complicated. The Curves window you see
at the bottom left define what property of the sound changes based on
distance. In this case, only the Output Bus volume changes (the red
one), which is the volume of the sound. You can also add a Low-pass
filter and Spread effect for when the player moves more and more
away from the sound (I can’t figure out what Spread does though). Change
the settings of Curve from None to Custom to do just that.
Finally, here’s a simple demonstration of playing around with the curve
by adding extra points and changing the curve type (double left click on
a curve to make an extra point, right click to change its type):
One rule of thumb is to make sure that the volume of the sound isn’t decreased too much in the first few meters. Otherwise, the volume will change very intensively when you’re close to it, which is a bit unrealistic if you’re going for very loud sounds. It can also become an annoyance, given that the volume changes based on the position of the player’s camera (which changes very fast), and not the player itself.
But luckily, WWise makes this distance testing very easy! The little Distance <distance number> box you see at the top of the graph is a button that you can move around, emulating how it would sound in the actual game! This should always be used for fine-tuning the current configuration.
If you want to learn more about the Attenuation settings, I will highly recommend you to check out this tutorial by AudioKinetic. Also, here is another tutorial for the User-defined position source setting when using 3D sounds.
Creating an Event
Okay, so now we have our sound effect imported and its settings all
configured properly! But how do we create an event that will activate
it? This is simple to do, and again, can be done in two ways (well
actually three but I’ll show two). The first is to right click on the
sound file, go to New Event and then Play. Give your event a
name and you’re done!

The second way it to go to the Events tab in the project explorer, then click on the Default Work Unit under the Events folder, and press the Create New Event icon. Give your event a name, press enter and then select it, so that a new Event Editor menu pops up at the center of the screen (it’s important that it actually appears). Now, go to the Audio tab in the Project Explorer again, and then perform a drag and drop of your sound file inside the Event Actions window. Make sure you don’t accidently select the sound, or else the Event Actions window will be replaced with the Sound Property Editor. Done! WWise will automatically pick Play as the action, so no need to touch anything else.

I would recommend to always give your event name the “play_” prefix, just so that it easily helps you understand what it does if you forget later. Events can do a lot more than just tell a sound to play or stop, which is why prefixes like these are always useful to have. Although if you’re making ambient sounds, you don’t have to do this, since they’re never supposed to stop playing at any time anyway. For instance, TPP always just uses the sfx_ prefix for its ambient sounds, but does use play_ for other cases, such as background music.
At this point it’s worth mentioning that the event name is what we’ll use to tell the game to play the sound. So if you named your event sfx_ambientsound_0000, then this string is what the game will use to play it. The sound files (which are converted to .wem when building a sound bank) don’t do anything by themselves, they’re just the raw sound data. Every single sound you hear in the game is played through an event.
Creating & Building a Sound Bank
Creating the Bank
Alright, now that we’ve done that, it’s time to build the sound bank! We’ll have to create it by going to the SoundBanks menu in the Project Explorer, then selecting the Default Work Unit under the SoundBanks folder icon and clicking the small Create New SoundBank icon a bit above that. Give it a name. Now if you click on it, you’ll notice that nothing happens! This is because we’re using the Designer layout, which is what WWise defaults to. We can change this by going to Layouts at the very top of the screen and selecting SoundBank, or just by pressing F7 (use F5 to go back to Designer). These layouts are useful to have, depending on what you’re working on. For music, there’s the Interactive Music layout. For dialogue, you have the Dynamic Dialogue and so on.

Configuring the Sound Bank
Now that we’ve changed to the SoundBank layout, we have yet another new menu: the SoundBank manager! This is where we have the configuration for the soundbank(s) we want to build. In our case, there’s only one sound bank, right under the Default Work Unit (make sure you expand it by pressing the + button). You will also notice a check box next to it. The sound banks that are ticked are the ones that will be generated when you press the Generate or Update buttons. But before we build the sound bank, we will also have to configure what will be contained inside it. WWise doesn’t know what should or should not be included in a sound bank automatically, so it has to be done the manual way. But it’s very easy to do. All that’s required is a simple drag and drop of your events and sounds into the sound bank. But you don’t have to select every single one if you have a lot of them. Instead, you can drag all of your Default Work Units onto the sound bank, and WWise will handle the rest for you. Doing this means that everything that’s inside the Default Work Units will automatically be included in the sound bank. That is, of course, if those sounds are ticked. That’s what the tick boxes next to the sounds are for. Excluding sounds is as simple as unticking their tick boxes. Here’s this entire process in a GIF:

Building the Sound Bank!
Okay, so now that everything’s configured, it’s time to build the sound bank! WWise lets you create a sound bank for many different systems, such as Windows, Mac, iOS and Android, as well as for different languages. But for MGS:V, we only use Windows, and English (unless you want to implement dialogue in many different languages). Don’t worry if you’re using Linux or Mac, these options only exist if the developer wants to do things differently for every platform. For MGS:V, you’ll never need to do this. So, all you have to do now is tick the Default Work Unit (and then the sound bank will also be ticked), and then go to the other menus on the right and tick Windows and English (US). And finally, press Generate!

Congratulations! You’ve created your very first sound bank! But where was it saved? The answer is: in your project folder, and then in GeneratedSoundBanks and Windows. By default, your project folder is in your Documents/WwiseProjects folder. You will find two soundbank files: Init.bnk and <name of your sound bank>.bnk, as well as some more miscellaneous files. For the purposes of MGS:V, we leave Init.bnk alone. The second bank is what we want. It stores your sound files, as well as any events and anything else you’ve done with your project.
Something that you might’ve noticed by now is that WWise creates .bnk files, but MGS:V uses .sbp, so what gives? We should just rename the bnk to sbp and that should be enough, right? Well, no! Sbp files are a little bit different from bnk, but not that different. They include some unique sections that are never found in a bnk. Fortunately, we only need one of those sections for this custom sound bank to work, and it’s easy to do!
Hex-Editing the Generated Bank
Adding the SBPL Section
Remember how I mentioned at the start of the tutorial that you’ll need a hex editor? Well, now we’re going to use it. We’re going to modify the sound bank (no, not Init.bnk, the other one that has the same name as your sound bank in WWise) and add a new section, which has the signature of SBPL. So, open it up with HxD or the hex editor of your choice, and you should be greeted with something like this:
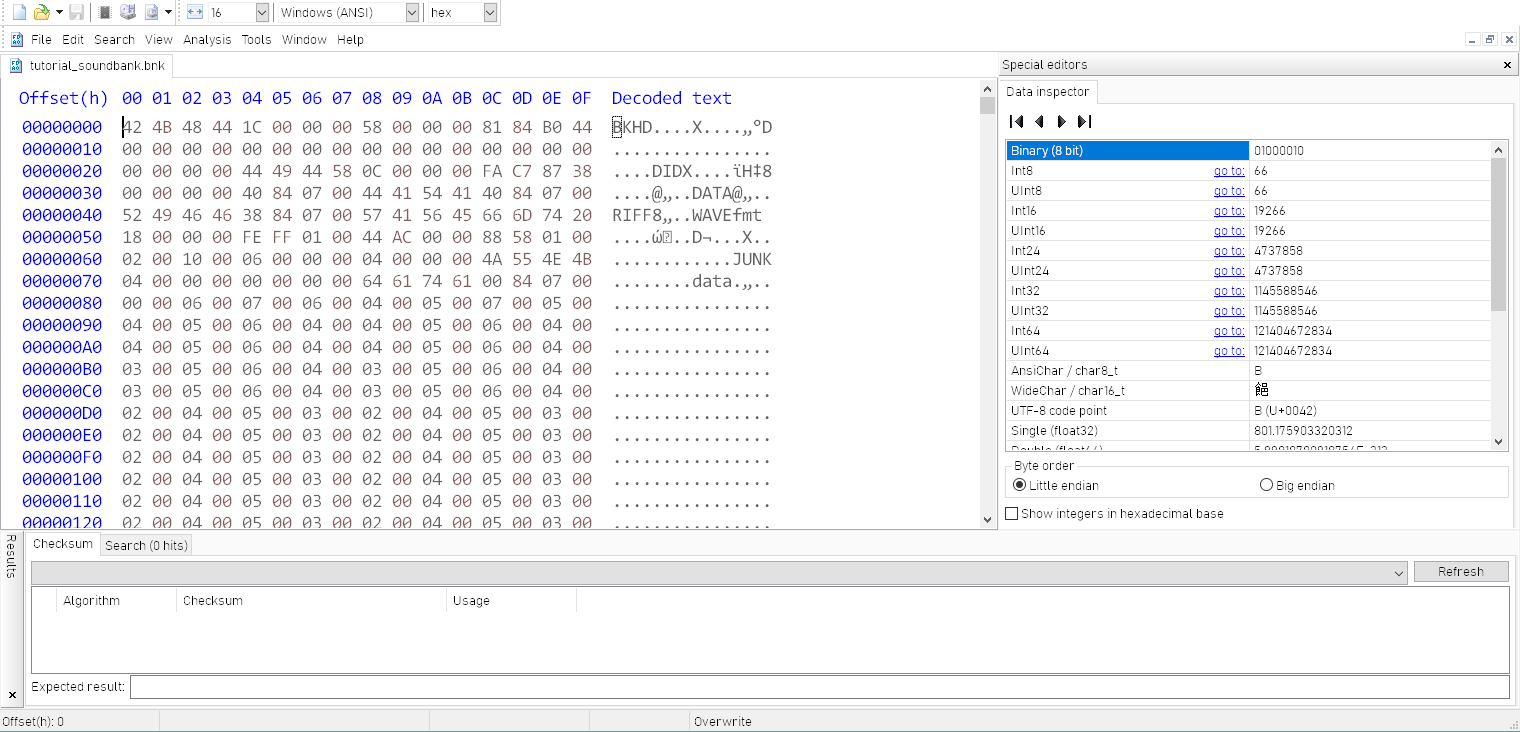
This is the binary representation of your custom sound bank in a hexadecimal format. All that needs to be done is a simple copy + paste, and a small change in an integer. The SBPL section that I mentioned is always contained at the start of the file, so that makes the job even easier. Here’s the hex bytes you’ll need to copy and paste:
53 42 50 4C 01 14 00 00 62 6E 6B 00 20 00 00 00 83 73
C7 01 00 00 00 00 00 00 00 00 00 00 00 00
(Ctrl + C and Ctrl + V, or right click and Paste Insert). But make sure that you’ve selected the first hex byte of the file, so that the cursor is at the very start of the file:

And of course, make sure that the new hex bytes are inserted into the file, and it doesn’t replace the BKHD section below. If it does that, then you can press your insert key to change the write type to Insert instead of Overwrite.
But wait, there’s more!
Updating the SBPL Section Size Integer
This section that we just pasted in has an unsigned integer that holds a size. We won’t get into the details of what it is, but it has to be updated for every sound bank you make. Calculating the new value is easy. All you have to do is select the entire file in your hex editor (or just Ctrl + A), and see the length of this selection, which is usually mentioned at the bottom of the screen. In HxD it’s referred to as “length”, and by default it’s stored in a hexadecimal format (you can verify this if there’s an (h) next to “length”). If this is the case, you’ll have to convert it back to decimal using the good old calculator (if your calculator can convert between decimal and hexadecimal that is. For Windows 10, change the calculator category from Standard to Programmer). After the conversion, subtract 32 from this number (32 when in decimal, or 20 in hexadecimal). This is the new value we’ll have to replace. For instance, if the length of the file is DA28200, converting it to decimal gives us 228753920, and subtracting 32 from that is – hey! This isn’t first grade math class!
But where do we replace this integer? The answer is, at the offset 0x10 in hexadecimal, or 16 in decimal, from the start of the file. The hex editor of your choice must have a “Go to” menu that comes in handy for doing this. Usually the shortcut is Ctrl + G. After going to this location, we use the Data Inspector on the right, and replace the integer that way. Make sure you replace the variable in the UInt32 section (or just Int32 if the number isn’t larger than 2 billion), because we’re modifying a 32 bit integer.
Now we’re done! So, go to File -> Save As, and save your file with the extension of .sbp. This is our final sound bank file that the game will read. If you ever make any changes to your sound bank, you’ll have to re-do this process again. As of writing this tutorial, there isn’t a program that automatically does this. Beware though: if this number is incorrect, the sound bank may not work!
Setting Up the Mod Files
Explanation
We are finally done with the WWise part of this tutorial! The rest will explain how to add the sound bank in a mod and also add the necessary files so that the game loads it properly. This step is required, regardless of how the actual sound is used in the game. The process isn’t hard to do, but it will feel like chaos when done for the very first time (same goes for WWise or anything Fox Engine related really).
There are two necessary files needed in order for TPP to load a sound bank: a fox2, also known as a DataSet file, and an sdf. The fox2 will load the sdf, which in turn will load the custom sound bank (sbp file). Depending on where you want to use the sound bank, both of these files will exist in different folders. For a custom mission, for example, both of them will be in your mission’s fpkd file. For a custom location, they will typically be inside the “common” fpkd file of said location, and so on.
However, the path to the sound bank will always be the same. All sound banks in TPP (and GZ) are always stored in /Assets/tpp/sound/asset/. It can’t be any other folder, and it must not be in an fpk or fpkd. In other words, it has to exist in the root location of your mod’s folder.
For example, if your soundbank is named testbank.sbp and your mod folder is called MyMod, then the path will be MyMod/Assets/tpp/sound/asset/testbank.sbp. For beginners, notice the capital ‘A’ in Assets. It has to be capitalized, due to the way the game handles the file paths by turning them into a hash. Likewise, tpp, sound and asset have to be lowercase.
The Fox2 File
Now, here’s a simple example of a fox2 xml file that loads an sdf (you can copy it if you want):
<?xml version="1.0" encoding="utf-8"?>
<fox formatVersion="2" fileVersion="0" originalVersion="">
  <classes>
    <class name="Entity" super="" version="2" />
    <class name="Data" super="Entity" version="2" />
    <class name="DataSet" super="" version="0" />
    <class name="SoundPackage" super="" version="1" />
    <class name="TexturePackLoadConditioner" super="" version="0" />
  </classes>
  <entities>
    <entity class="DataSet" classVersion="0" addr="0x05A7B290" unknown1="344" unknown2="73604">
      <staticProperties>
        <property name="name" type="String" container="StaticArray" arraySize="1">
          <value></value>
        </property>
        <property name="dataSet" type="EntityHandle" container="StaticArray" arraySize="1">
          <value>0x00000000</value>
        </property>
        <property name="dataList" type="EntityPtr" container="StringMap" arraySize="2">
          <value key="example_soundbank">0x05A7B300</value>
          <value key="TexturePackLoadConditioner0000">0x05047390</value>
        </property>
      </staticProperties>
      <dynamicProperties />
    </entity>
    <entity class="SoundPackage" classVersion="1" addr="0x05A7B300" unknown1="888" unknown2="73606">
      <staticProperties>
        <property name="name" type="String" container="StaticArray" arraySize="1">
          <value>example_soundbank</value>
        </property>
        <property name="dataSet" type="EntityHandle" container="StaticArray" arraySize="1">
          <value>0x05A7B290</value>
        </property>
        <property name="soundDataFile" type="FilePtr" container="StaticArray" arraySize="1">
          <value>/Assets/tpp/sound/package/example_soundbank.sdf</value>
        </property>
        <property name="syncLoad" type="bool" container="StaticArray" arraySize="1">
          <value>false</value>
        </property>
      </staticProperties>
      <dynamicProperties />
    </entity>
    <entity class="TexturePackLoadConditioner" classVersion="0" addr="0x05047390" unknown1="72" unknown2="0">
      <staticProperties>
        <property name="name" type="String" container="StaticArray" arraySize="1">
          <value>TexturePackLoadConditioner0000</value>
        </property>
        <property name="dataSet" type="EntityHandle" container="StaticArray" arraySize="1">
          <value>0x05A7B290</value>
        </property>
        <property name="texturePackPath" type="Path" container="StaticArray" arraySize="1">
          <value></value>
        </property>
      </staticProperties>
      <dynamicProperties />
    </entity>
  </entities>
</fox>
As you can see, it loads the sdf file at the specified folder. That folder path should point to the sdf inside your fpkd, and not in some sdf at the root folder of your mod, because that’s very messy and unorganized. If you rename your sdf name in the path to something else, make sure the actual file has the same name, or else the game won’t find it and it will be very hard to track down the problem.
Note: The name and path of the fox2 file doesn’t matter (it has to be inside an fpkd though). The game always “opens” any fox2 file that it can find automatically. This isn’t the case for sdf, which is why we need a fox2 to load that one.
The SoundPackage entity in the fox2 has a syncLoad setting, but what it does is unknown. Perhaps it forces the game to load the sound bank when you’re in a loading screen, instead of when it’s actually required?
The Sdf File
Next up is the sdf file. Now this one is what actually loads the sound bank. Again, here’s another example of a simple one:
<?xml version="1.0" encoding="utf-8"?>
<fox formatVersion="2" fileVersion="0" originalVersion="">
  <classes>
    <class name="Entity" super="" version="2" />
    <class name="Data" super="Entity" version="2" />
    <class name="DataSet" super="" version="0" />
    <class name="SoundDataFileInfo" super="" version="0" />
  </classes>
  <entities>
    <entity class="DataSet" classVersion="0" addr="0x05A7C250" unknown1="232" unknown2="164635">
      <staticProperties>
        <property name="name" type="String" container="StaticArray" arraySize="1">
          <value></value>
        </property>
        <property name="dataSet" type="EntityHandle" container="StaticArray" arraySize="1">
          <value>0x00000000</value>
        </property>
        <property name="dataList" type="EntityPtr" container="StringMap" arraySize="1">
          <value key="SoundDataFileInfo0000">0x05A7C020</value>
        </property>
      </staticProperties>
      <dynamicProperties />
    </entity>
    <entity class="SoundDataFileInfo" classVersion="0" addr="0x05A7C020" unknown1="112" unknown2="164637">
      <staticProperties>
        <property name="name" type="String" container="StaticArray" arraySize="1">
          <value>SoundDataFileInfo0000</value>
        </property>
        <property name="dataSet" type="EntityHandle" container="StaticArray" arraySize="1">
          <value>0x05A7C250</value>
        </property>
        <property name="loadBanks" type="String" container="DynamicArray" arraySize="1">
          <value>example_soundbank</value>
        </property>
        <property name="prepareBanks" type="String" container="DynamicArray" />
        <property name="prepareEvents" type="String" container="DynamicArray" />
      </staticProperties>
      <dynamicProperties />
    </entity>
  </entities>
</fox>
As you can see, this time we don’t have a path, but only the name of the sound bank, without the extension. This is why I mentioned that the path to the sound bank must be /Assets/tpp/sound/asset/, it’s hard-coded. And again, the actual sound bank (.sbp) must not be in any fpk or fpkd file, but in the root location of your mod’s folder. Change the loadBanks string to your sound bank’s name (without the .sbp extension) and you’re done!
Also, don’t touch the prepareBanks or the prepareEvents options. I’ve never seen them being used anywhere in the game anyway.
Never forget to re-build your fox2 and sdf files when you update their corresponding xml using FoxTool! It’s very easy to miss. You can always just check the last modified date to verify.
Also, I have to mention again that the name of the event is what’s actually used to play the sound, not the name of the sound itself! This is true for anything you’re using the sound for. Dialogue, ambience, background music, anything. The name of the sound file doesn’t matter in the end. What matters is the name of the event that plays it.
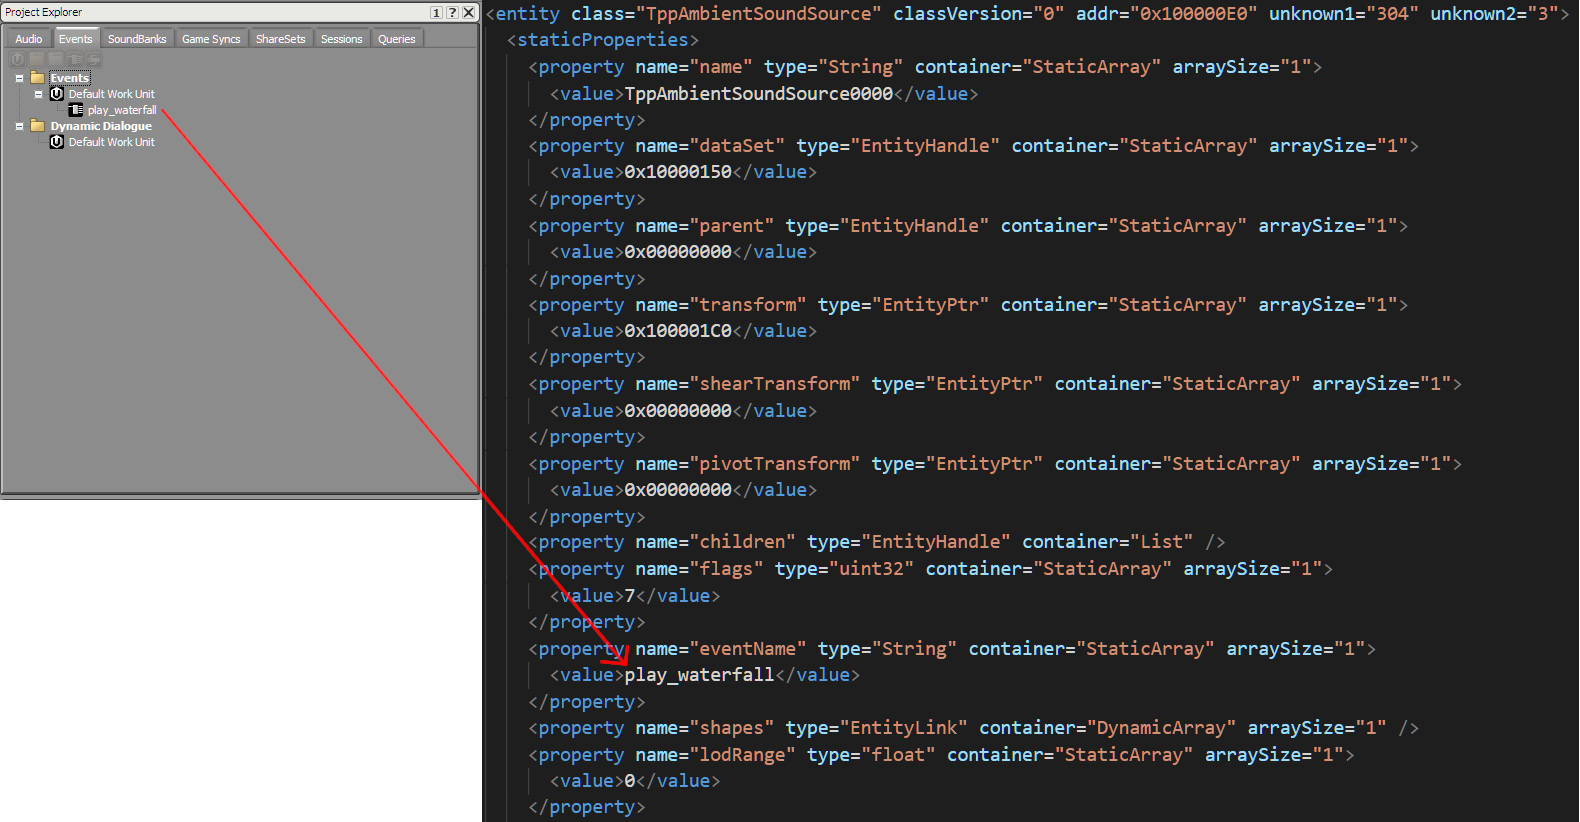
For example, here’s how it’s done for an ambient sound:
Conclusion
That’s basically it for the tutorial! If everything went well, your custom sound bank should work in the game! If you want a quick way to test if it really worked, you can use some of TPP’s lua commands that play events, such as:
TppSoundDaemon.PostEvent(“Your event name here”) or,
TppSoundDaemon.PostEvent3D("Your event name here",Vector3(1, 2, 3) )
for 3D sounds (change the 1, 2, 3 to your desired coordinates).
These can be used in a custom mission’s sequence.lua, or the empty mission of a custom location (also known as “free roam”).
If you’re making ambient sounds, then you should use the SoundSource or TppAmbientSoundWorld entities for that purpose (those are entities in fox2 files). Just replace the eventName with the name of your event, and update the playRange accordingly. Also, set the volumeRtpc to ambient_volume.
As a final note: you might have noticed that the custom sound is quite loud in-game. This is because the volume is the same as the original sound .wav file, which is usually as loud as it can be. The easiest solution to this is to just decrease the volume in WWise, in the General Settings of the sound. However, this isn’t how the game’s sounds actually fix this problem. The actual solution would be to use the correct Audio Bus that the game has for the specific scenario (ambient sounds, dialogue etc). But this isn’t well known territory, so even I don’t have the answer as to what Audio Bus should even be used for every case. Unfortunately, we only know too few of the hashes of the names of the game’s audio busses, which makes it very hard to identify what audio bus does what (since the hashes are just numbers). But I don’t think this is a huge concern, because the sound will work perfectly fine, even if it uses the default Master Audio Bus. Although a bizarre bug has been found, where sometimes a sound doesn’t get muted when the game is paused. No one knows the cause of that as of yet. Even some of TPP’s ambient sounds suffer from this issue (the flag in Wakh Sind Barracks, for instance).
Troubleshooting
If the custom sound bank doesn’t work, here’s the most common causes:
- The xml files of either the fox2 or the sdf were not run through FoxTool after being changed (so just drag and drop the xml one by one into FoxTool and the file will be generated).
- The path to the sdf in the fox2 file is incorrect. This is very easy to miss.
- The sound bank file (.sbp) is not inside <Mod Folder Name>/Assets/tpp/sound/asset/.
- The sound bank name in the sdf is misspelled.