Unpacking and Organizing Game Files
Contents
Contents:(WIP) A guide on unpacking game files, plus some general tips and advice on organizing them into appropriate subdirectories.
Creating a Workspace and Subfolders
The first thing you’ll want to do is create a folder somewhere to store
all of your future work and mod tools. I keep mine in Documents, but
anywhere on your computer should work. You can name this folder anything
you want, but for this example I’ll call it “Fox Modding”.
 Inside of that folder, we’ll start by making our two most important
subfolders, “Data” and “Tools”. The titles here are a bit
self-explanatory, but we’ll be expanding these folders later on. Next
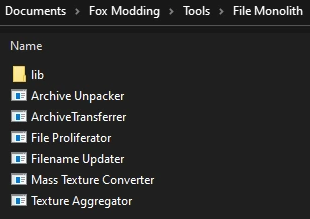
we’ll grab some tools, regardless of what game you want to unpack, one
tool we’ll need for all of them is File
Monolith.
We’ll make a folder for it inside of our Tools directory and extract it
there.
Inside of that folder, we’ll start by making our two most important
subfolders, “Data” and “Tools”. The titles here are a bit
self-explanatory, but we’ll be expanding these folders later on. Next
we’ll grab some tools, regardless of what game you want to unpack, one
tool we’ll need for all of them is File
Monolith.
We’ll make a folder for it inside of our Tools directory and extract it
there.
If you want to, you could even create shortcuts for File Monolith’s
applications and store all of the dependencies in another subfolder. You
could also add shortcuts in your
SendTo
folder for other tools you can’t associate with a specific file type.
 Now that
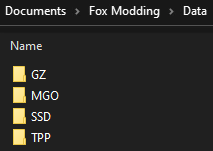
we have our Tools folder set up, let’s start working on the Data folder.
Inside, we’ll want to make a subfolder for each game we want to unpack.
I’ll use the official abbreviations for each game, so…
Now that
we have our Tools folder set up, let’s start working on the Data folder.
Inside, we’ll want to make a subfolder for each game we want to unpack.
I’ll use the official abbreviations for each game, so…
- GZ = Ground Zeroes
- MGO = Metal Gear Online 3
- SSD = Survive (Stealth Survival Defense)
- TPP = The Phantom Pain
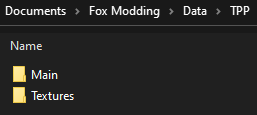 Inside of
each you’ll want to make a folder for our unpacked assets, and another
for the converted textures. You can name them anything, but I’ve been
using “Main” and “Textures” for a while. You could add other folders to
Fox Modding too, a folder of shortcuts to the game folder, or save
locations for each game. You could also save uncompressed Steam
screenshots to a Screenshots folder by changing your default screenshot
folder location:
Inside of
each you’ll want to make a folder for our unpacked assets, and another
for the converted textures. You can name them anything, but I’ve been
using “Main” and “Textures” for a while. You could add other folders to
Fox Modding too, a folder of shortcuts to the game folder, or save
locations for each game. You could also save uncompressed Steam
screenshots to a Screenshots folder by changing your default screenshot
folder location:
- Steam > Settings > In-Game > Screenshot Folder
Unpacking The Phantom Pain
 Monolith is all we’ll need for The Phantom Pain, and if you’ve followed
the guide above, you already have it installed. The first thing we’ll do
is run the Archive Unpacker. When the dialog box opens, go ahead and
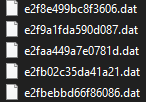
click the ellipses button beside the Archives input. Next we’ll select
most of the .dat files inside of TPP’s master folder, making sure to
ignore any files with the e2f prefix.
Monolith is all we’ll need for The Phantom Pain, and if you’ve followed
the guide above, you already have it installed. The first thing we’ll do
is run the Archive Unpacker. When the dialog box opens, go ahead and
click the ellipses button beside the Archives input. Next we’ll select
most of the .dat files inside of TPP’s master folder, making sure to
ignore any files with the e2f prefix.
- (The e2f .dats are actually just video files for a few cutscenes, if you want to view them, just rename the extension from .dat to .wmv)
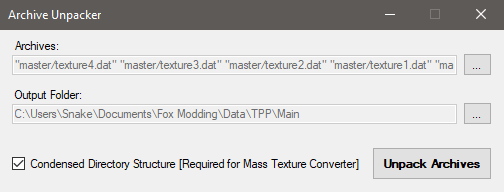 After selecting the chunk, data, and texture .dats, go ahead and set the
Output Folder to our TPP\Main folder. Lastly, make sure that the
Condensed Directory Structure option is checked, and hit the Unpack
Archives button. We’ll have to run the Archive Unpacker a few more times
to grab the .dats inside of the 0 and 1 folders, but these shouldn’t
take near as long to unpack.
After selecting the chunk, data, and texture .dats, go ahead and set the
Output Folder to our TPP\Main folder. Lastly, make sure that the
Condensed Directory Structure option is checked, and hit the Unpack
Archives button. We’ll have to run the Archive Unpacker a few more times
to grab the .dats inside of the 0 and 1 folders, but these shouldn’t
take near as long to unpack.
It doesn’t matter which of these one you extract first, so long as they
are done after the .dats from TPP’s master folder. Remember to make sure
Condensed Directory Structure checked.
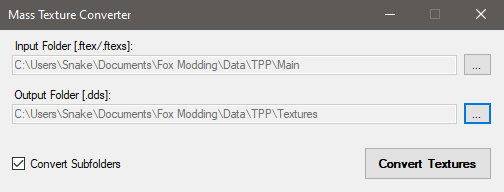 Now that we have all of the .dats extracted, it’s time to convert our
textures. Start up File Monolith’s Mass Texture Converter and select our
Main folder for the Input Folder. The one we extracted all of the files
to. Next, set your output folder to our TPP\Textures folder. Make sure
the Convert Subfolders box is checked and click Convert Textures. When
it’s done you’ll be finished unpacking The Phantom Pain.
Now that we have all of the .dats extracted, it’s time to convert our
textures. Start up File Monolith’s Mass Texture Converter and select our
Main folder for the Input Folder. The one we extracted all of the files
to. Next, set your output folder to our TPP\Textures folder. Make sure
the Convert Subfolders box is checked and click Convert Textures. When
it’s done you’ll be finished unpacking The Phantom Pain.
You should have two folders now, one with the raw unpacked files, and another with only converted textures. The entire thing should be around 50 GB once everything is unpacked.
SnakeBite
With SnakeBite installed, mods are stored in the 00.dat and 01.dat. The original data from these are then placed in the newly created archives, a_chunk7.dat, and a_texture7.dat, respectively. Snakebite moves this data so that mods may be installed more quickly.
When unpacking TPP, you should treat a_chunk7.dat and a_texture7.dat as though they are 00.dat and 01.dat, skipping the 0 folder entirely.
Unpacking Metal Gear Online
Next up, run File Monolith’s Archive Unpacker, and under the Archives prompt, select the two .dat files from TPP’s mgo folder. The output folder will be our MGO/Main folder, just make sure that the Condensed Directory Structure option is checked, and click the Unpack Archives button.
Once it’s finished unpacking, open the Mass Texture Converter, select MGO/Main for the Input, and MGO/Textures for the Output. Make sure the Convert Subfolders option is enabled, and click Convert Textures. MGO is unpacked.
Unpacking Survive
Once again, File Monolith will be our tool of choice here. We’ll keep this short, since there aren’t many differences between unpacking TPP and Survive. So, run File Monolith’s Archive Unpacker, click on the ellipses button beside the Archives input, and select all of the .dats inside of Survive’s master folder. Survive doesn’t have any cutscene files to ignore, but we’ll still need to run the Archive Unpacker again to grab any remaining .dats from the 0 folder. Once you’re finished unpacking .dats, run the Mass Texture Converter and you’re done.
Unpacking Ground Zeroes
 Unlike The Phantom Pain or Survive, Ground Zeroes uses it’s own .g0s
format for .qar archives. File Monolith’s Archive Unpacker doesn’t
support this filetype, but we can still use it’s Mass Texture converter
after we unpack the textures. Our tool of choice for unpacking these
.g0s archives is the
GzsTool 0.2,
make sure to use this old version of the tool, as later versions will
not work with Ground Zeroes.
Unlike The Phantom Pain or Survive, Ground Zeroes uses it’s own .g0s
format for .qar archives. File Monolith’s Archive Unpacker doesn’t
support this filetype, but we can still use it’s Mass Texture converter
after we unpack the textures. Our tool of choice for unpacking these
.g0s archives is the
GzsTool 0.2,
make sure to use this old version of the tool, as later versions will
not work with Ground Zeroes.
- (Remember those e2f prefixes from TPP? Ground Zeroes’ data_00.g0s is the same thing, a cutscene.)
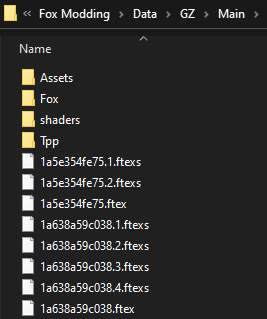
We’ll simply drag data_01.g0s and data_02.g0s onto the GzsTool 0.2 and wait for the tool to finish unpacking. Once it’s done, we’ll move everything out of the new data folders (created by the GzsTool) and into our GZ Main folder in Fox Modding. All that’s left is to run File Monolith’s Mass Texture Converter and point it at our GZ Texture folder.