FoxKit: TppLightProbe, PointLight and Spotlight
Contents
Contents:This guide show how to set a Probe to indoor space and add two types of light, Point and Spot. Require the user to know how Datasets and Entities in FoxKit.
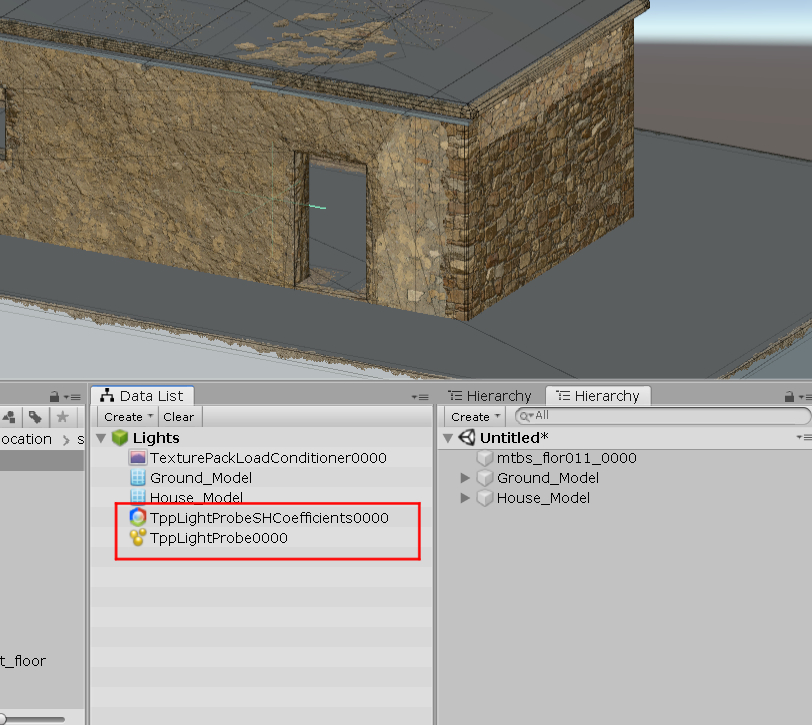
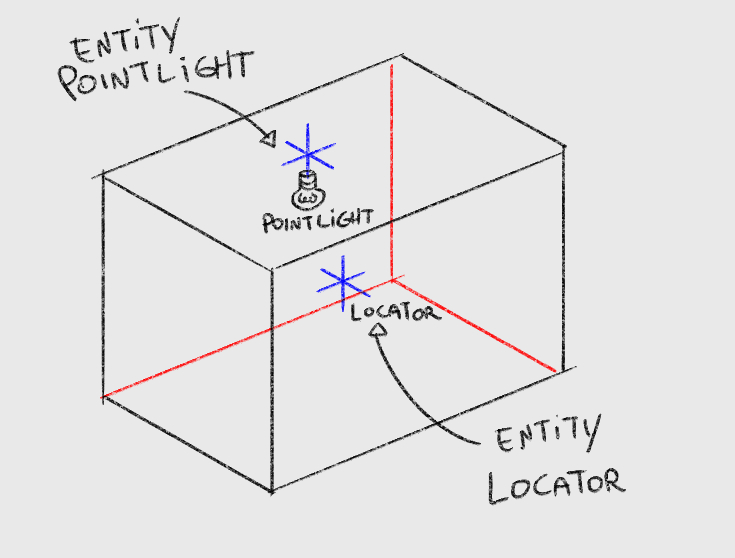
First. create a Dataset and add two Entities. TppLightProbeSHCoefficients and TppLightProbe. Ground and House is just to have a better picture of the use here.
LightProbe
TppLightProbeSHCoefficients
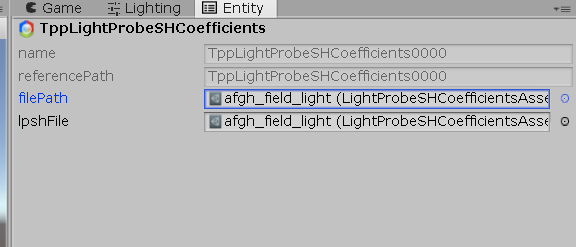
TppLightProbeSHCoefficients will load the lpsh file that have all the probes inside to use. We can reuse the lpsh afgh_field_light.lpsh found in Chunks\Assets\tpp\pack\location\afgh\pack_large\afgh_field_fpk\Assets\tpp\level\location\afgh\block_large\field\afgh_field_light.lpsh
Copy and paste to the fpk of you mod that match with the folder structure in FoxKit. In my case my mod load here \Assets\tpp\pack\location\smpl\smpl_fpk\Assets\tpp\level\location\smpl\block_common\afgh_field_light.lpsh
And in FoxKit Assets\tpp\level\location\smpl\block_common\afgh_field_light.lpsh.
Drag and drop the file afgh_field_light.lpsh in TppLightProbeSHCoefficients.
LightProbes in LPSH file
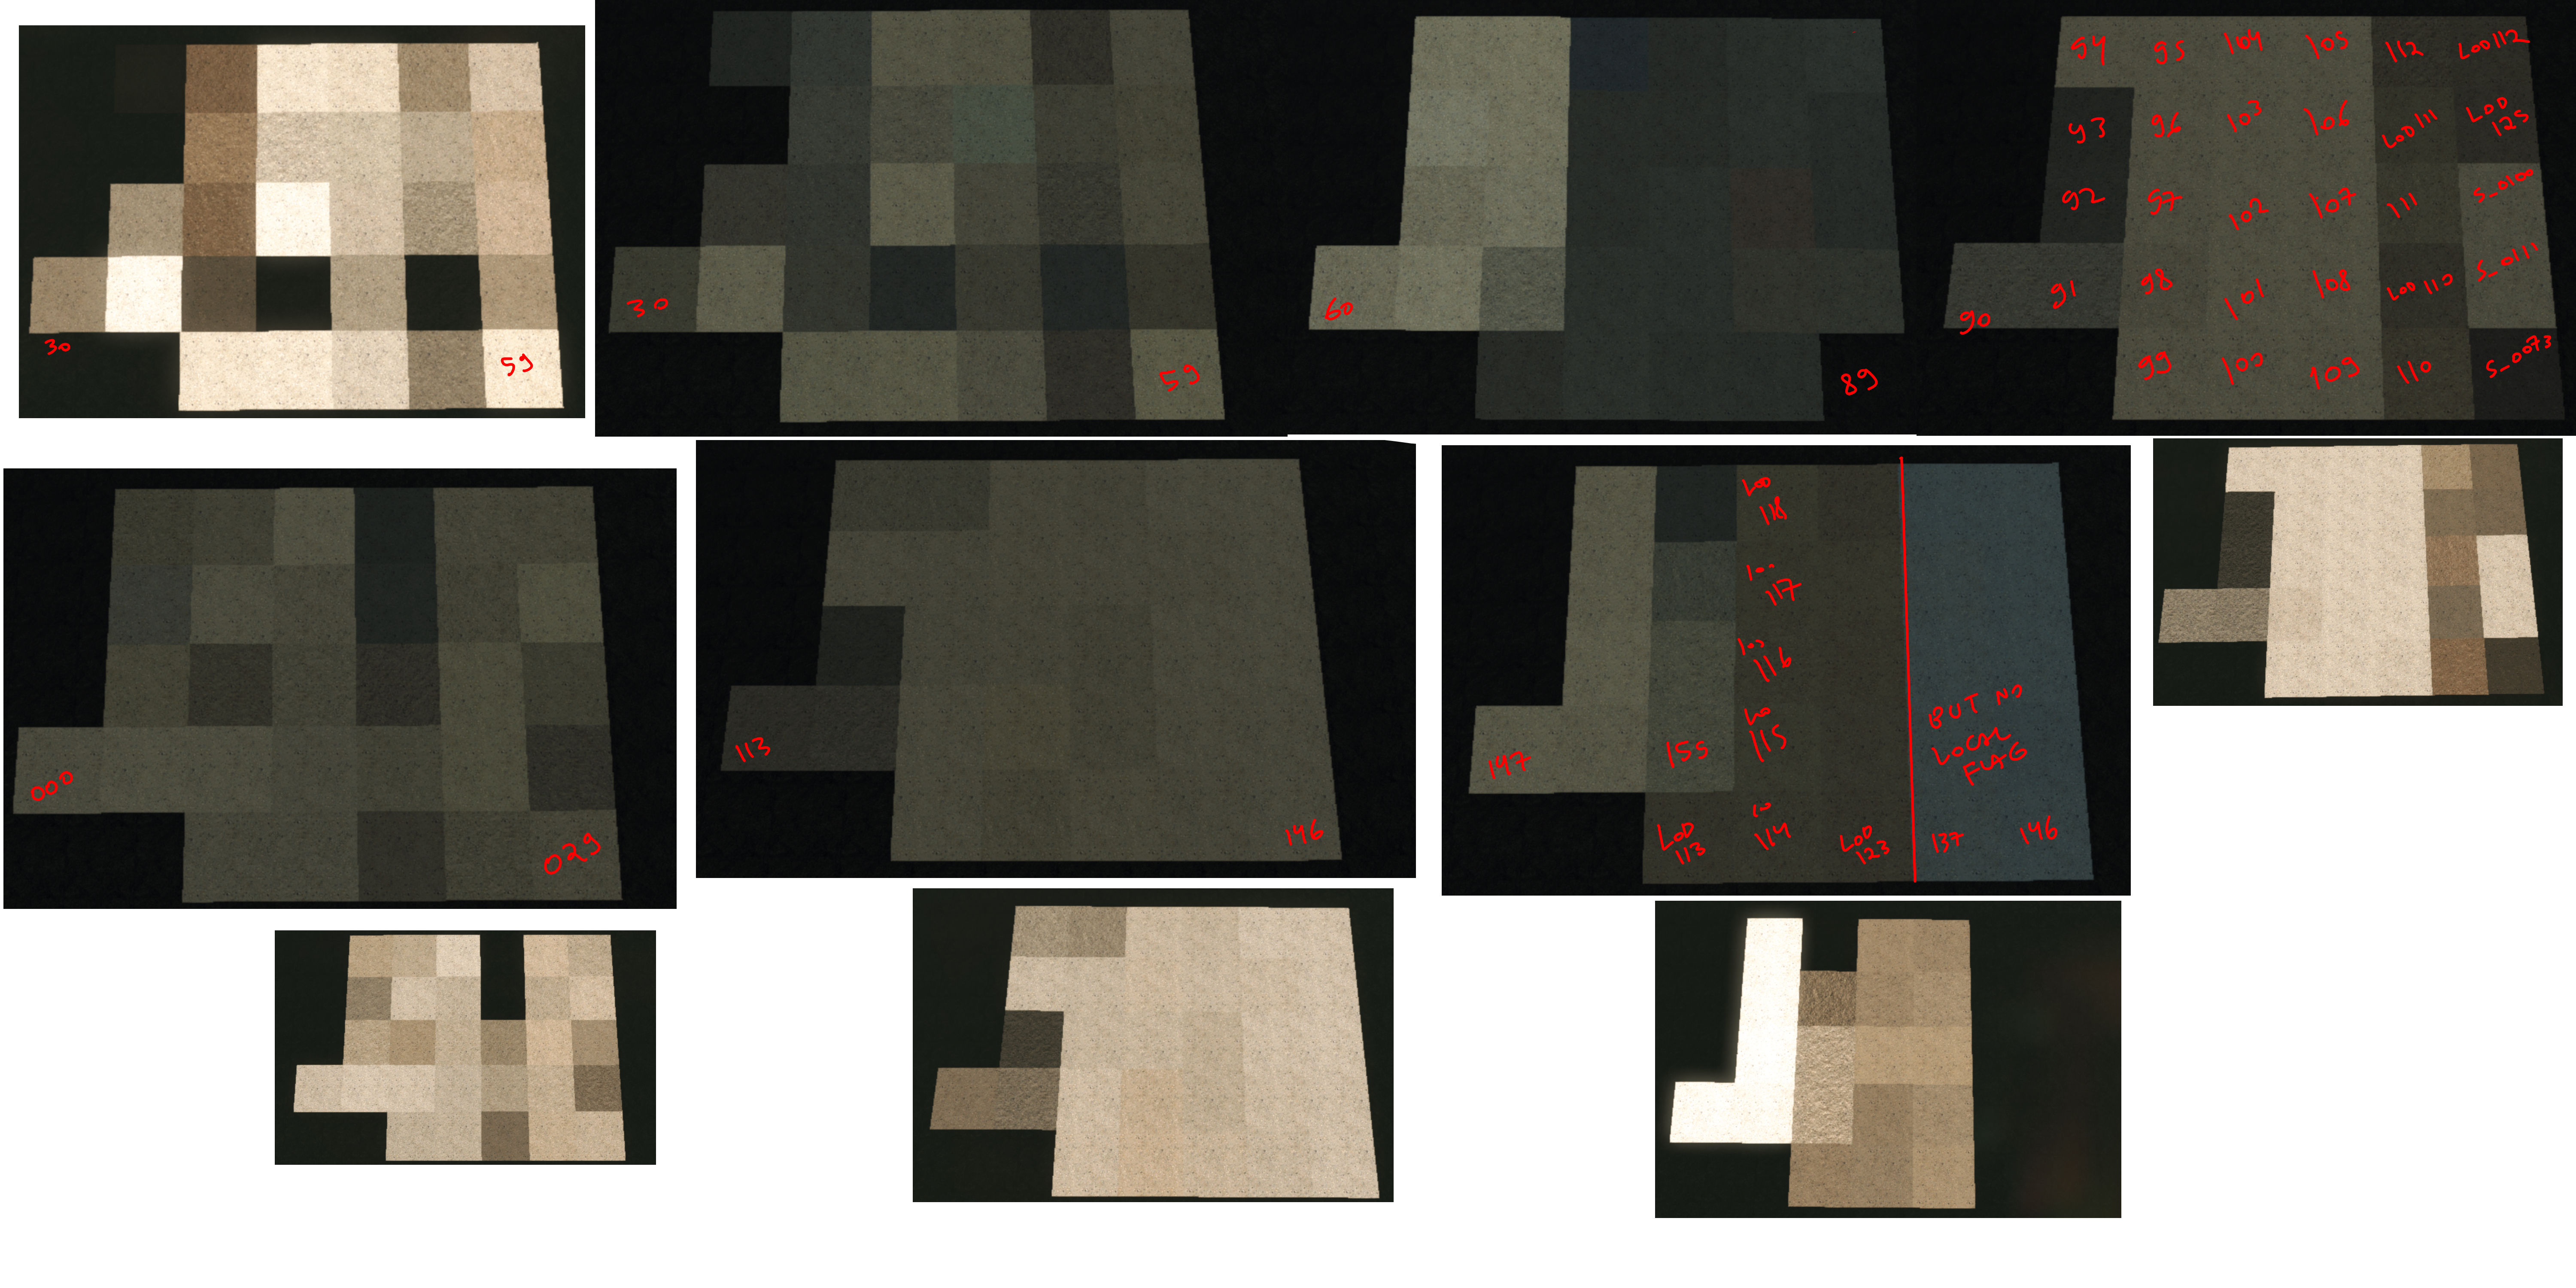
Before move to TppLightProbe have a look on image below. I list all the
124 probes that afgh_field_light have inside in day and night light.
Some are dark while other are bright. All have this tint of afgh colour
in red, orange, yellow. At night it goes green, grey blue. Indoor areas
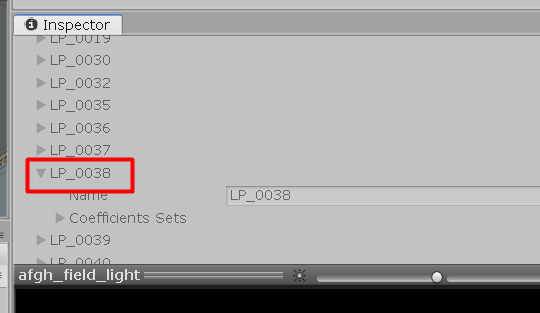
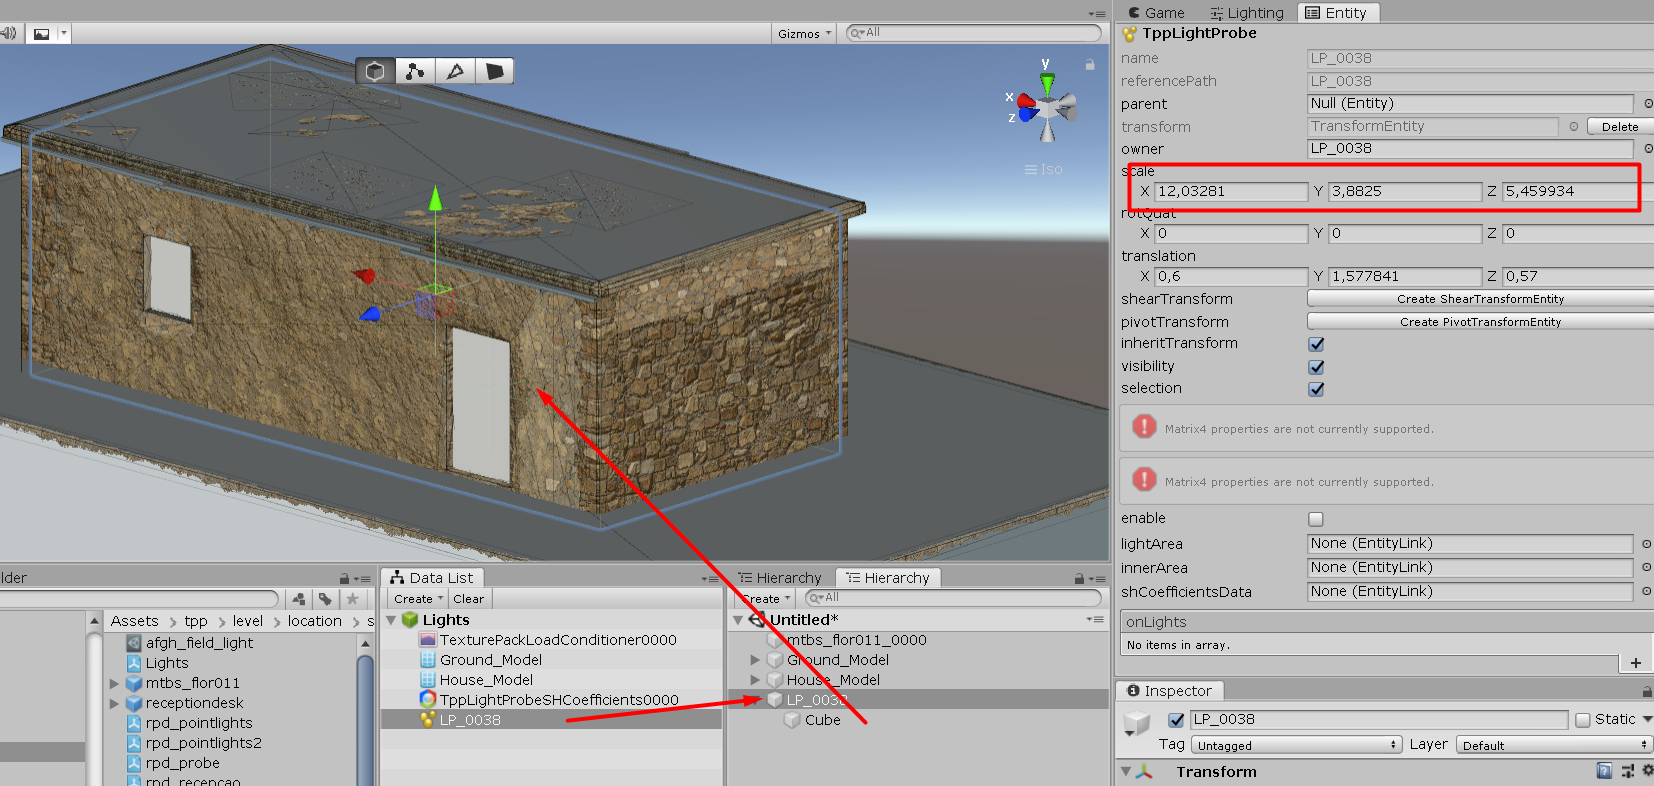
use dark probes. So lets choose the LP_0038. The name “LP_0038” you
can find inspecting the lpsh in FoxKit and its matter write the exactly
name of the Probe in Dataset if you want make work.

Name in FoxKit.
TppLightProbe
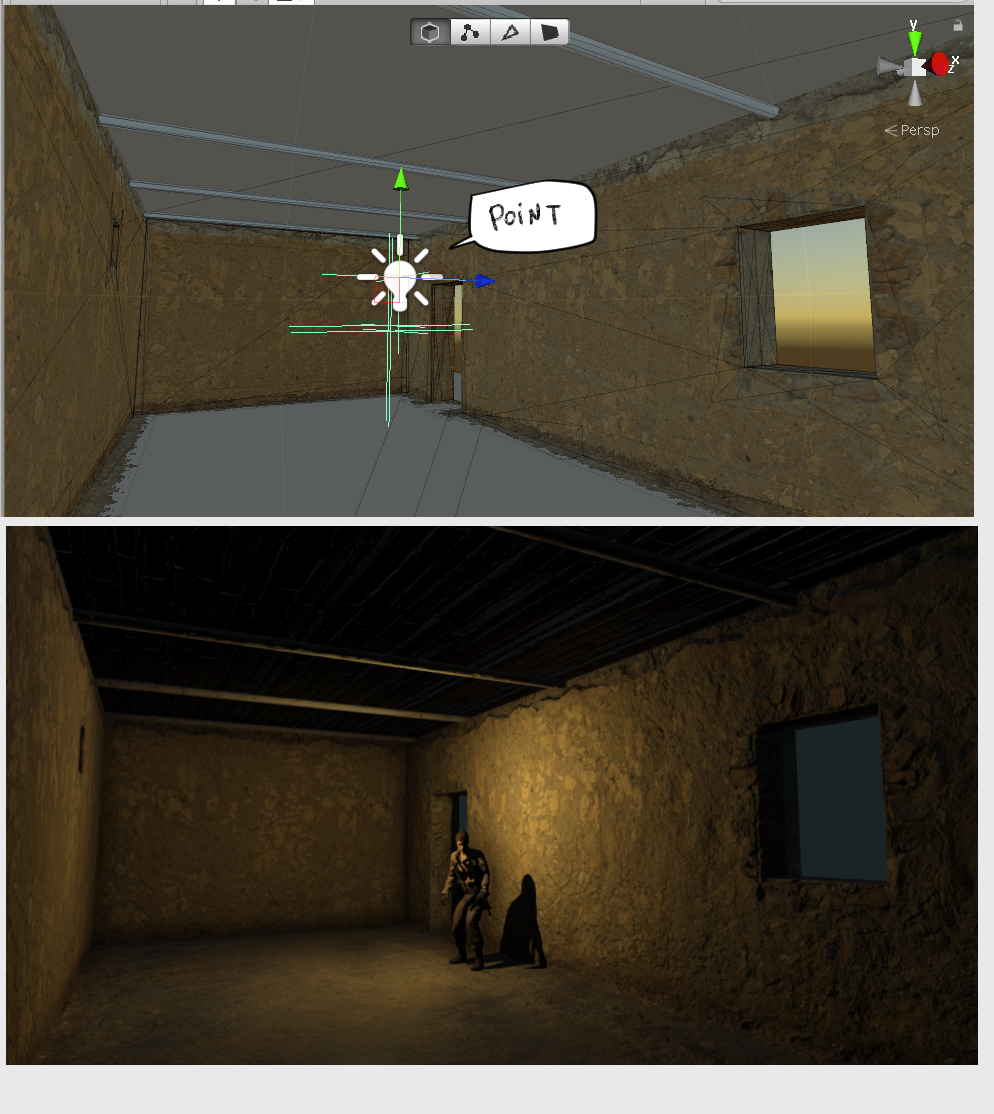
1 . After choose the probe to use. Rename to the one in Dataset before adding to the scene. We choose LP_0038.
2. Hit TransformEntity to the Entity go to Scene.
3. Create a primitive cube under the lightprobe and move/rotate/scale the entity to fill the inside of the house. Remember to add the scale in TppLightProbe window later,
Now. Lets see all the parameters TppLightProbe have.
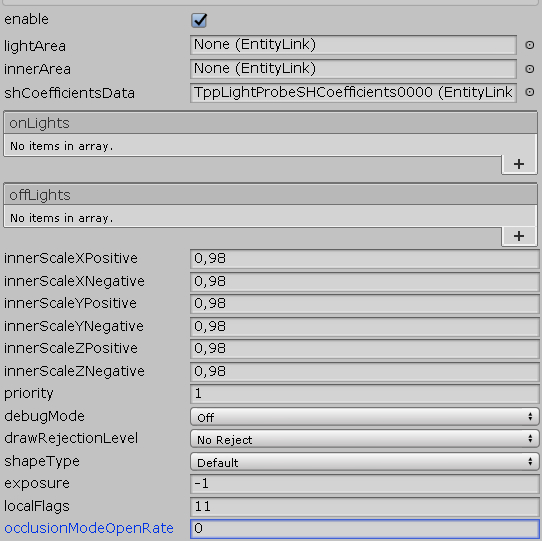
enable = True or False. Check true of course.
lightArea = Can be a locator entity to store the area where probe will happen, but in this case we dont need to use.
innerArea = To be Written. Can be left empty for now.
shCoefficientsData = is the lpsh so our LP_0038 will have the probe inside the lpsh. Open and choose TppLightProbeSHCoefficients0000 here.
onLights and OffLights = To be Written. Can be left empty for now.
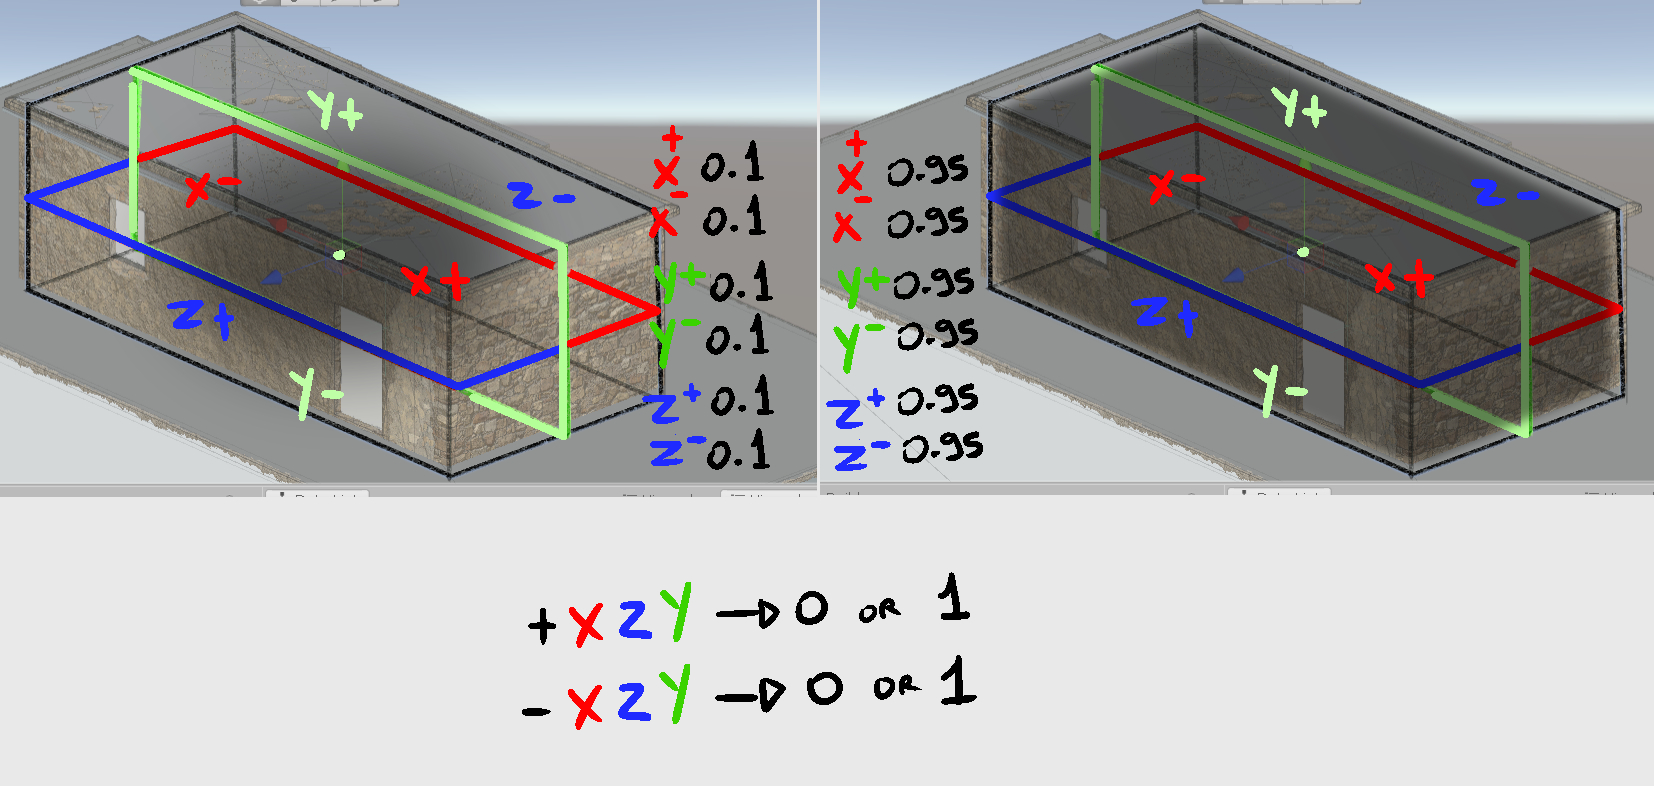
innerScales = Are the float values between 0 and 1. If above 1 it will unload. Look the graphic about it below. The Axis is the mid of this probe and then we have the X+-, Y+- and Z+-. A Value of 1 in all will fullfill the probe in the map sharp. While a value of 0 in all the innerScales will show a soft probe. For indoors the best is 0.98 in all. There are nice probes to configure here. If the house were open on a side so we could diffuse the probe to this open side.
priority = This parameter define which probe will be over another probe. Its common use tons of probes and then use a huge one to diffuse some probes or use a Probe to Dark all the map first and then use lots of probes with more priority to bright the area. Number can be 500 to 1 and 500 be the low in priority and 1 be the first of course.
debugMode = To be Written. Can be left empty for now.
drawRejectionLevel = We can choose Level 7, no Reject. This show the distance of rendering the entity. Game normally use Level 4.
shapeType = Default is the square cube. For experimentation later, why not use the other options…
exposure = To be Written. I try to add lots of values but nothing happen here. I choose -1 mostly because all the entities I found use the same. Need to test more to see if more values does something or not. I have some ideas that this is the amount of time the player need to recover from see the color of probes or when goes off the probe to the light.
localFlags = To be Written. Choose 11 should be fine.
occlusionModeOpenRate = To be Written. Can be 0.
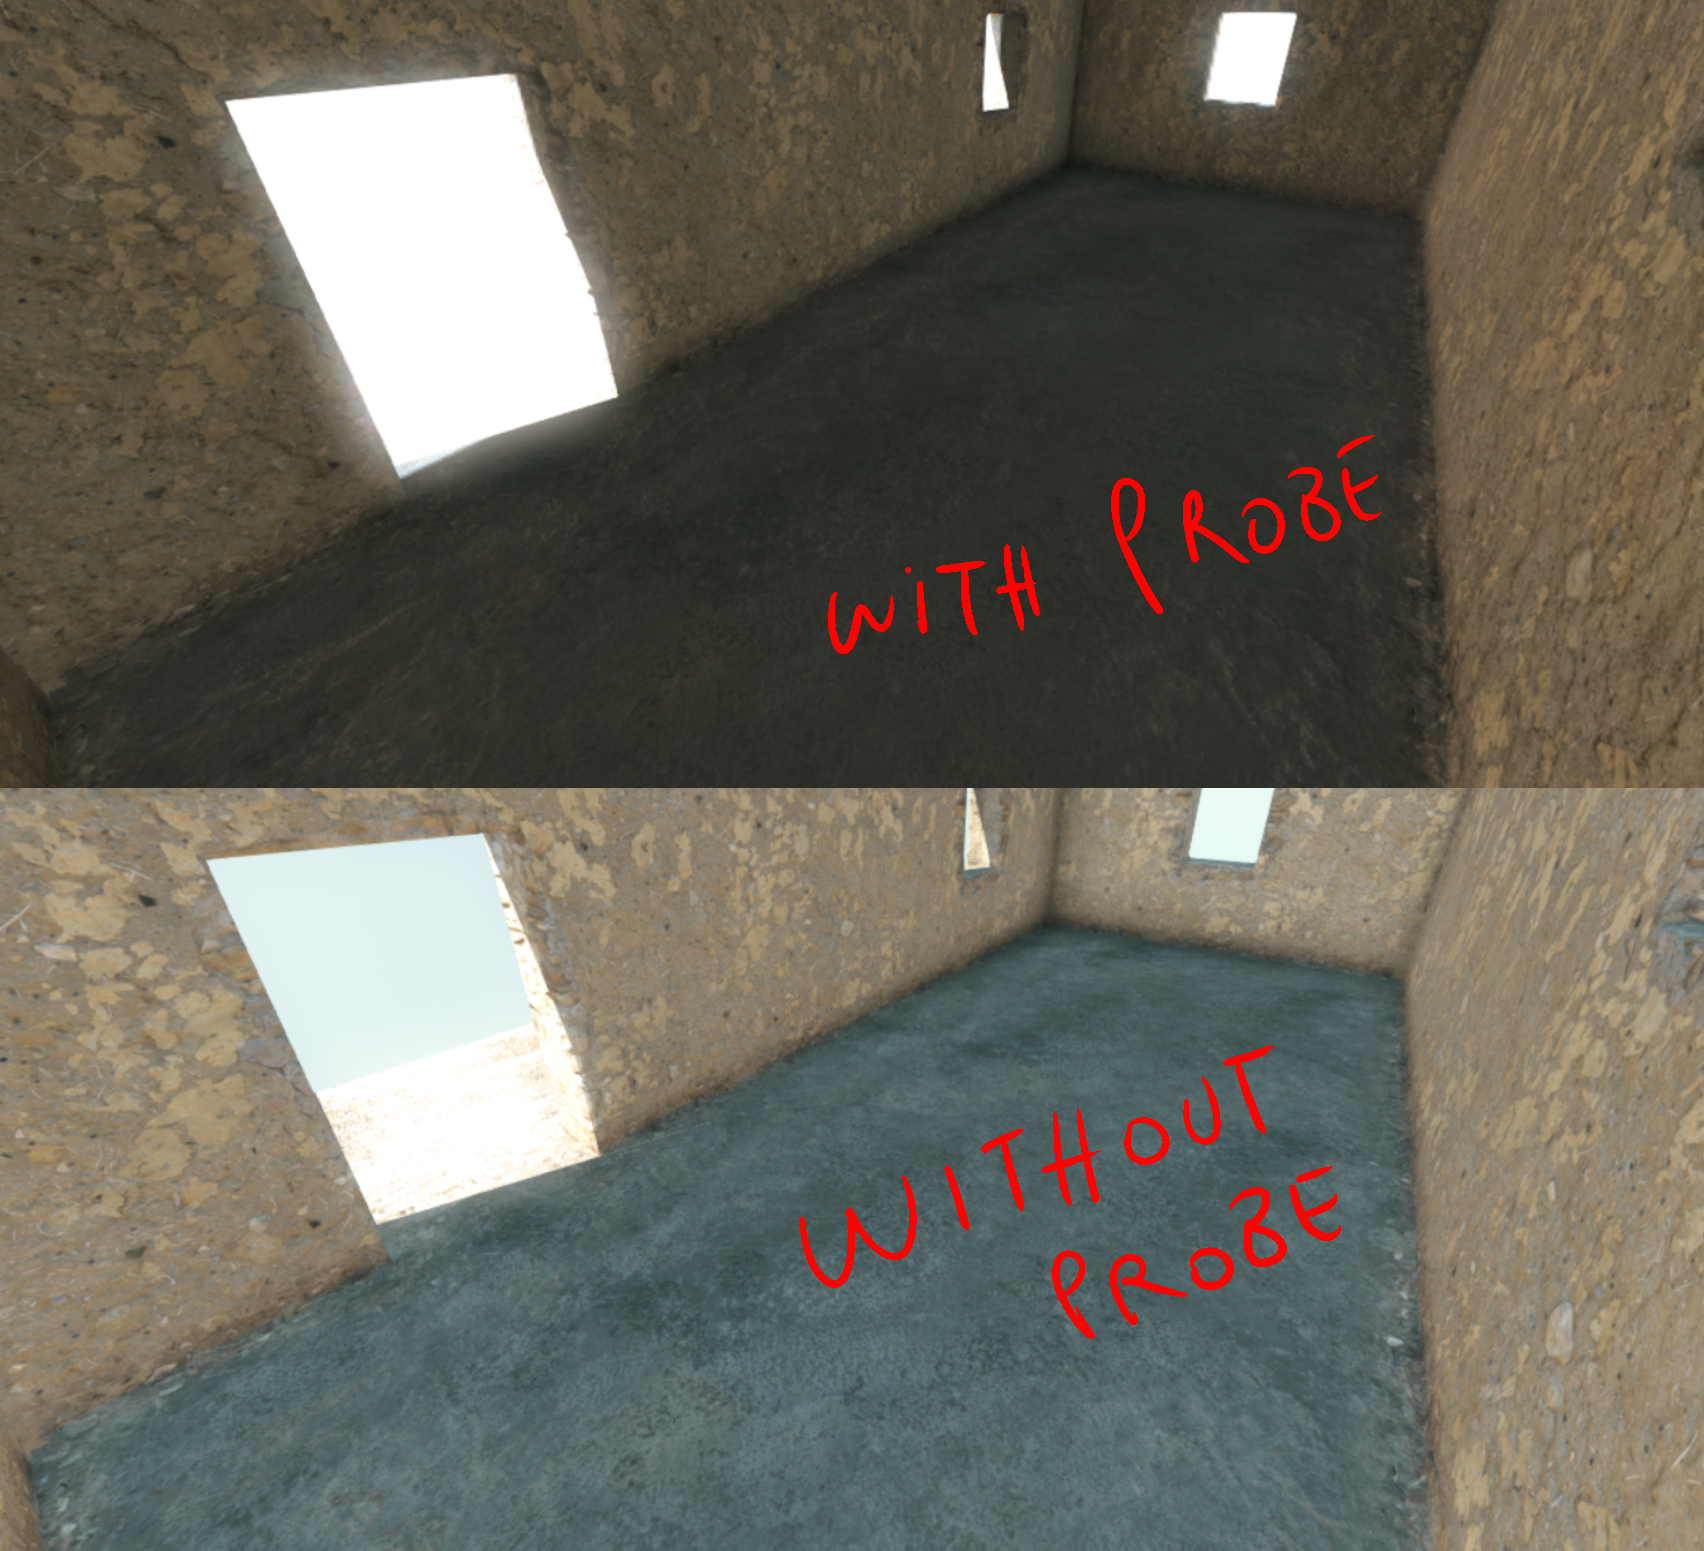
In Game it shows like this.
Small Fix in FoxKit to show Flags.
FoxKit normally dont show the localFlags parameter. To enable this option in the Entity go to \FoxKit\Assets\FoxKit\Modules\DataSet\Fox\TppEffect and open in any editor the file TppLightProbe.Generated.cs.
Find this line and change the Never word to EditorAndGame. Same will be happen to PointLight and SpotLight entities.
[OdinSerializeAttribute, NonSerializedAttribute, PropertyInfoAttribute(Core.PropertyInfoType.UInt32, 504, 1, Core.ContainerType.StaticArray, PropertyExport.Never, PropertyExport.Never, null, null)]`

private System.UInt32 localFlags;
PointLight
PointLight Entity use a second Entity to convey the LightArea using the Entity Locator to do the room of light, rotate and scale. The PointLight Entity itself does not scaled or rotated, only move inside the LightArea as the pivot of the source light. Just think like the lamp position (Pointlight) inside a room (Locator). For the record, looks like a parameter of Locator “size” is always set to be 1, not 0.
The IrradiantionPoint need to be test, though can be left for now.
Color
PointLight use Color to delivery aesthetics visual. The strenght of the color wil change once we set the Temperature which will turn it warm or cool. So, if you choose a green, this green color can be warm if temperature is lower or cool if the temperature is higher.
Set Alpha to 255 if you want to keep the max of colour strenght in the field.

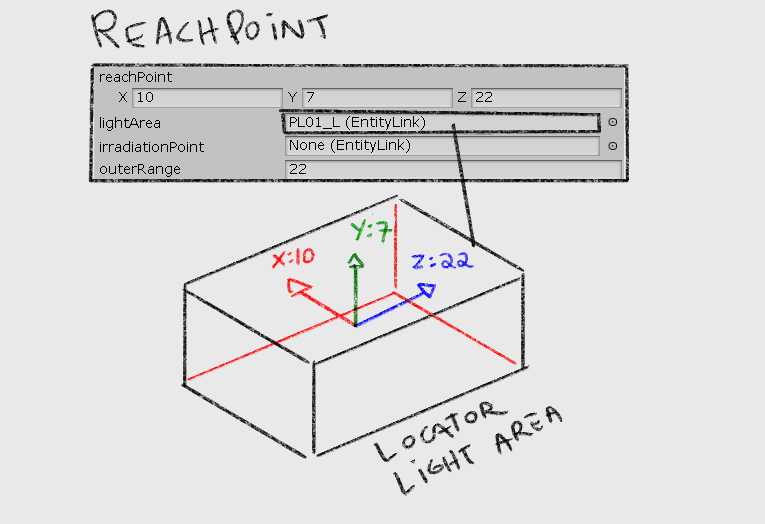
ReachPoint
The Scale of the Entity Locator looks to fit the ReachPoint Field. And the OuterRange will set how far the light will get, to the bounder. Usually the best OuterRange size would be the minimum ReachPoint value so that the light will fade correctly inside the room. For now, I set 22 in the example.
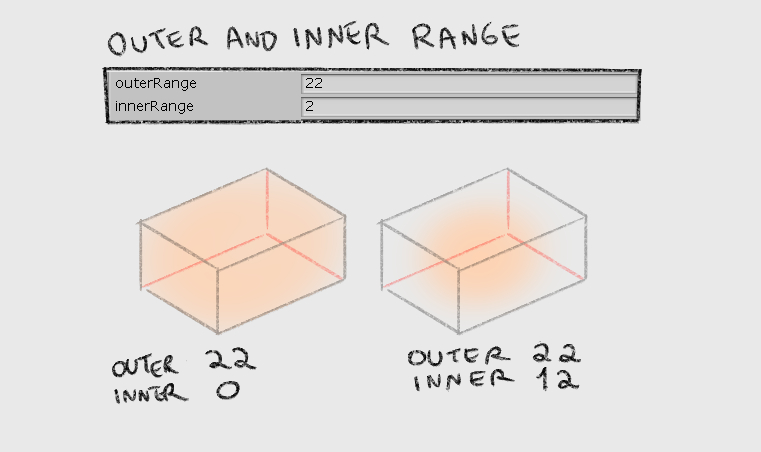
OuterRange and InnerRange
The OuterRange have the values between the minimum and max values of ReachPoint. If a square reachPoint is 10,10,10. The OuterRange can be safely 10. 11 does not nothing. Then once set the Outer, InnerRange will be 0 to 9. If Inner is 10 or higher it will turn off Light. As well, inner does the fade of the light as near of the OuterRange Value.
Image below show using the Outer fade to Z: 22. Even if Inner is 12 so that the light will be diffuse, the Y value is 7 and the Height of the room will hit stronger.
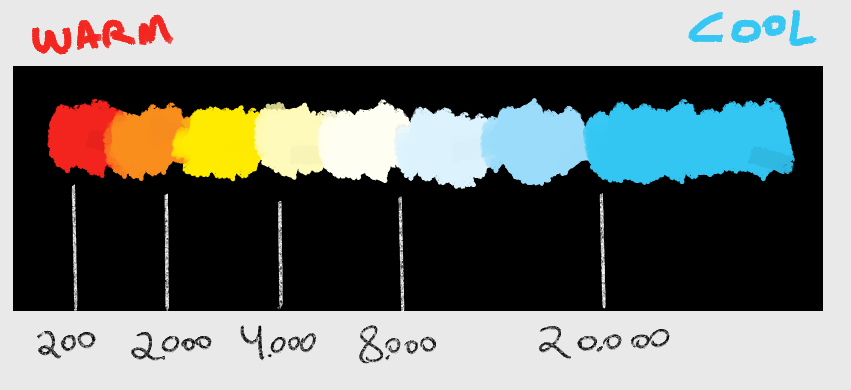
Temperature
This turn the color Warm or Cool. The Values are pretty much between 0 to 80.000 if needed.
Color Deflaction. The float parameter may help adjust a color to be right, but need more test. For now, can be left 0 value.
Lumen. Its the Brightness of the source Light. A Value between 100 to 20.000 is safe to use. 20.000 will shiny maybe too much…
LightSize. Need to test more. It does increase brightness a little bit if value is set to 1. Float can be left with 0.
Dimmer. Does lower the brightness. Float can be left with 0.
ShadowBias. It displace the shadow position that Light creates if LodShadowDrawRate is higher than 0. This float can be negative or positive.
LodFarSize and LodNearSize does have a huge impact to look right, the light. It need more test to create a perfect Light. My best values so far are LodFarSize 40 and LodNearSize 140. But I did not get a logic between then, yet. I hope anyone can contribute here.
LodShadowDrawRate. If 0, it will not cast shadow even if LocalFlag does the true value for castShadow. Between 0.1 and 1 if will slowly add the shadow cast by the Light source. More than 1 does not have any effect as float 1 pitchdark the shadow area. 0.5 will opacity the shadow.
LightFlags.I hope CapLag can write better here about it. So far, put value 11 does everything it need.
LodRadiusLevel. Between 0 or 7.
LodFadeType. Note sure what are the types. It looks like common have 4 here as it see in many PointLight Entities.
The Result
== SpotLight == To be written