 MGSV Modding Wiki
How to add custom sounds
Contents
Contents:In this article I’ll be explaining how to change sounds in MGSV. This guide will assume you have none of the tools required or any experience with modding.
There are a few things you need to have done before you begin, so before we actually do anything let’s go over a checklist.
Things to have done before you begin
- An easy to access folder that will act as your workstation.
- Have File Monolith in your MGSV folder.
- Have Ravioli Game tools in an easy to access location, preferably within the workstation folder.
- Have Wwise 2015.1.9 downloaded and installed. While The Phantom Pain internally uses sound authored with Wwise version 2013.2.9, this guide is written with 2015.1.9 in mind.
- Have Snakebite Mod Manager downloaded and installed.
- Have Audacity installed.
- Have MGSV Sound Replacement Tool downloaded and in your workstation folder.
- Have the sound file you want to add to the game labeled and in the workstation folder.
Context for these programs
Before we go further I’ll give a brief rundown of these programs and what they’re used for.
File Monolith: You can’t just open MGSV files like a folder and browse the ones you want and pick them out. So file monolith has tools that makes copies of the files within the MGSV archives and extracts them into a readable format. If you don’t know how to use File Monolith refer to this guide to familiarize yourself.
Ravioli Game Tools: So this is an open source tool kit that comes with a few things, we only need “Ravioli Explorer” because it can read the file that the game sounds are packed in and listen to each one without needing to unpack the archive.
Wwise 2015.1.9: Don’t ask why you need this specific version, it’s
just the one that works for some reason. Downloading it and getting it
working is tricky so I’ll elaborate on that soon. But what this does is
it converts the soundfile you want to add into a format the game can
read, that being .wem.
Snakebite Mod Manager: Once you are done replacing the files it allows you to pack and install mods without damaging the original game files. Familiarize yourself with this guide.
Audacity: This is a generic audio editing tool, basically we need it to make any adjustments to sounds before we put them in the game. MGSV sounds also have different attributes depending on what they’re used for and we will use audacity to make sure the attributes of the sound we want to add match those that we want to replace. I’ll go into detail on it later in this guide.
MGSV Sound Replacement Tool: An amazing tool that allows us to take the sound files we spent so much time editing and creating and allows us to overwrite existing ones in the game. Will detail use later on in this guide.
Step 1: Find a sound you want to add
This is pretty self explanatory, you need to know what you want to add.
I’m gonna just assume you have whatever sound you want to add saved as a
.mp3 or .wav or something in your workstation folder.
Step 2: Find the sound you want to replace
This is tricky. The sounds in MGSV aren’t labeled, so you can’t just
search “footstep” and have it be labeled for you. You need to either
know the name of the file you want to replace or go through the sound
bank and listen to them until you figure out which one. Now in the game
many different sounds are stored in many different parts of the games
files. For the sake of this guide we’ll assume you want to change a
gunshot sound, which is located in common_bank_01.sbp in chunk0.dat.
Once you have chunk0 unpacked it should be in Assets\tpp\sound.
You *can* do anything you want with the files here since they’re just
copies but what you should do is copy it and make a folder in your
workstation folder and name it original common sbp or something so you
know this is the vanilla game’s sound bank.
So before we go any further, you have two ways of identifying the sound you need to change. The first is by using the sound codes page on the wiki. If you find the sound you’re looking for keep node of it’s file name.
Countfuzzball also has some more sounds documented here.
The second is by using Ravioli Explorer. But before that we need to do one last thing.
Step 2.5: Using MGSV Sound Replacement Tool
So the MGSV is a modified version of Wwise, with almost everything
stripped away from it. The .exe will unpack and repack the
common_bank_01.sbp we copied earlier. So make a copy of the
Wwise.exe and put it in the same folder as common_bank_01.sbp then
drag the .sbp onto the .exe to open it. This will create two folders, a
Wwise_Input and a Wwise_Output. For now open the Wwise_Output folder
and make a copy of common_bank_01_BNK.log this is a file that has
the filename and info on every sound file in this sound bank. You’ll
need it. This isn’t the last we’ll be using the sound replacement tool
but for now you can leave it alone.
Finishing Step 2: Using Ravioli Explorer
You only need to use Ravioli Explorer if you do not know which file you
want to replace yet. That is- you have not found the sound file you are
looking for in the sound codes section.
If you have not found it and need to look for the sound then you simply
click on “Ravioli Explorer” and click open file at the top left then
navigate to “Wwise_Output” then open common_bank_01.bnk from there
you can navigate through all the sounds in this bank. Once you find the
sound you’re looking for write down the number somewhere.
Step 3: Creating a replacement sound
Okay, you found which sound you want to replace, you know where it is, etc. Now we need to have a replacement for it. Replacing a sound file in MGSV is like giving a blood transfusion: it needs to match the original type or it will likely not work. It’s quite simple but I’ll start very basic anyways:
There are two main types of sound in this game: Mono and Stereo. Stereo sound is more detailed and can be affected by various things in game such as being indoors, etc. When a player shoots a gun, the gunshot sound is stereo. Let’s contrast this to Mono. Mono is generally lower quality, and isn’t affected by as many things as stereo such as directional sound, sound propagation, echoing, etc. It just plays the sound with minor variables. When an enemy shoots a gun in game, it is mono and uses a different sound file. I mention this just to give you an idea of what is made stereo vs mono.
The second thing is sample rate. This is basically a form of audio quality. I don’t know much more than that and it’s unimportant.
So the gist is that when you find a sound, you need to open it with Audacity, and make it stereo or mono depending on what the file you’re replacing is, and match the sample rate.
Step 3.5 Finding audio file details
Alright so in order to match the sound quality of the new file with the
old one, we need to know what the old one’s information was. This is
actually quite easy. Open up common_bank_01_BNK.log and this will
give you the information on every sound file.
Lets say we opened up Ravioli tools and want to replace 651564874 with
something. Well we simply open up the log and search for 651564874.
From the log I can see the real name of the file is RIFF_0902.wem.
Again the name that is RIFF_XXXX is the REAL name of the files.
Keep note of that. Furthermore I can see that the file uses “PCM” as an
audio format, is in Mono, and has a sample rate of 41,000Hz. Write all
of these things down somewhere.

Finishing Step 3: Creating the sounds
So the rest of this is self explanatory. Match the sample rate and audio
type (Mono or Stereo) in audacity then export the file from audacity.
Export it as a .wav for simplicity. You should put it and whatever other
sounds you want to add in a folder and rename each file to be
RIFF_XXXX obviously replace the XXXX with the number of the file you
want to replace.
Step 4: Converting your new audio files
Let’s make sure we’re on the same page: You should have your new file(s)
in .wav format, renamed to the files you want to replace such as
RIFF_0902.wem or something. These files also match the sample rate
and sound type as the original. If you’re at this point you are almost
done, don’t worry.
Let’s now open up Wwise 2015.1.9, not the Wwise.exe we used earlier. Here is a link to a video by Cuba on this part of the procedure, the relevant part is from 1:18 to 2:26.
Make a new project, then press “shift + K” then click on “source
settings” then click the three dots next to “Default Conversion
Settings” 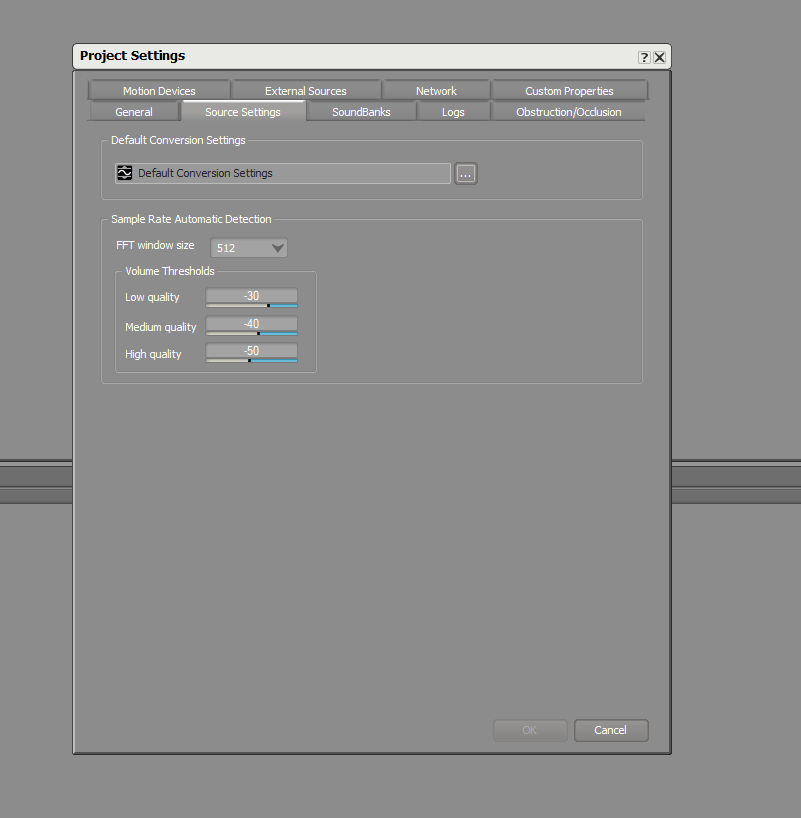 After you click that it should open up a new box that gives you some
options to convert the sounds. This is mostly mumbo jumbo to me, here’s
what matters: Remember the info about the sound file you got from the
log earlier? It said PCM, Mono, and 41,000Hz. This is the part where we
convert the new files to PCM. Again, not every file will be PCM but the
ones in
After you click that it should open up a new box that gives you some
options to convert the sounds. This is mostly mumbo jumbo to me, here’s
what matters: Remember the info about the sound file you got from the
log earlier? It said PCM, Mono, and 41,000Hz. This is the part where we
convert the new files to PCM. Again, not every file will be PCM but the
ones in common_bank_01 are all PCM. I don’t know what PCM means but
we need to have it. 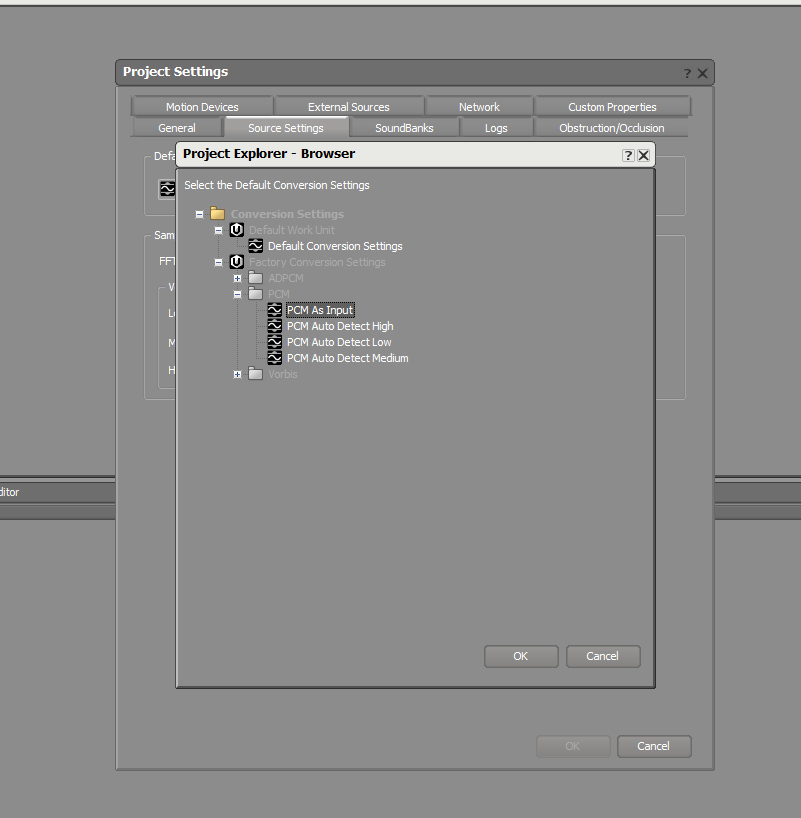 Select “PCM as input” this will convert all files we add to this project
to PCM.
Select “PCM as input” this will convert all files we add to this project
to PCM.
NOW we import the files to the Wwise project. Select project at the top, then click “Import audio files” if you have the files you want to add in one folder you can just select the folder.
Once you have all your files in then click “project” then “convert all
audio files” 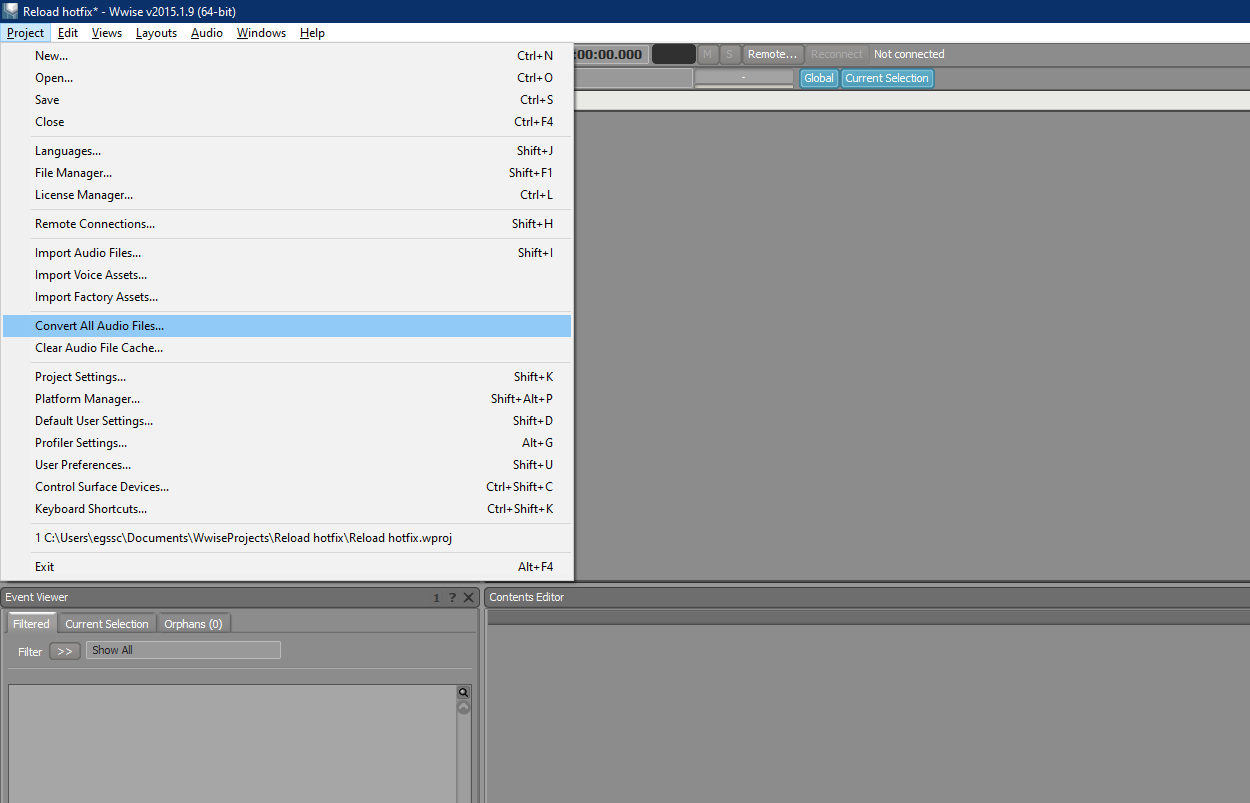 This will
export all your audio files to the cache of your project folder. Which
should be in
This will
export all your audio files to the cache of your project folder. Which
should be in WwiseProjects\(Project Name)\.cache\Windows\SFX.
Packing the files
Now take all the .wems and make sure their names are RIFF_XXXX.wem
they might have a bunch of numbers at the beginning or end don’t worry
about it just delete them.
Now we go back to the common_bank_01.sbp we have in our workstation.
Go to the Wwise_Input folder, then the common_bank_01BNK folder then
paste your new .wem files in there. Next drag the common_bank_01.sbp
back onto the Wwise.exe once more, this time it will compile the new
sounds and overwrite the old ones.
You’re done. Create a folder name it the name of your mod so for example
I’ll call mine “soundmod” I’ll now create these folders:
Soundmod\Assets\tpp\sound then in the sound folder I place the
common_bank_01.sbp. From here simply pack the file with Snakebite then
you’re done.