Common Steps
Contents
Contents:This page is just for containing steps that are the same across multiple guides in this section.
If you’re linked to something here follow the steps for that particular part then return to the guide that linked it, since some sections are only relevant for particular guides.
Checking where the game is installed
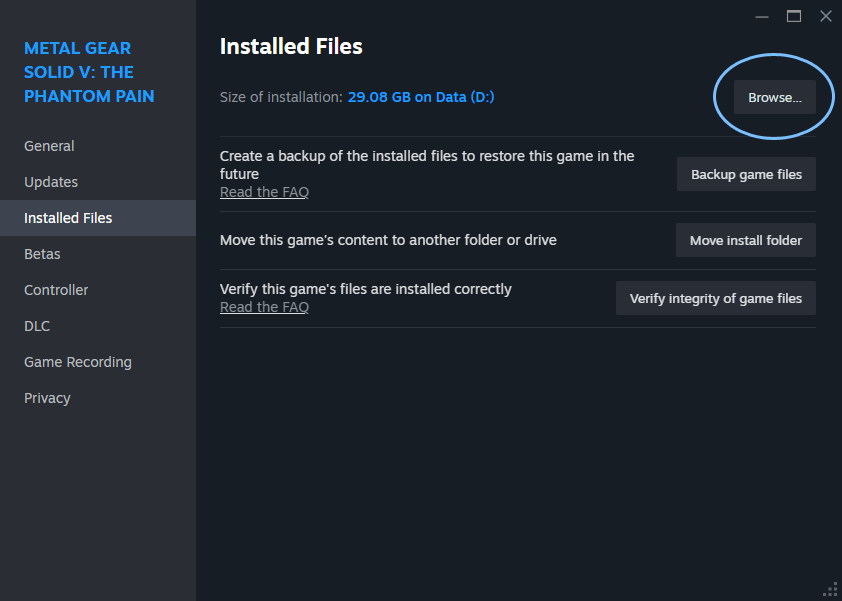
- Open Steam and right-click the game and select Properties.
- Click the Installed Files tab on the side and then click the Browse button. This will open the game directory.
- Take a note of the installation path. For mine it’s
D:\Steam\steamapps\common\MGS_TPP\but yours will likely differ.
Setting up SnakeBite
If you don’t already have SnakeBite configured follow these steps. This assumes the SnakeBite installer has already been run to copy the program’s files to the desired directory.
- From SnakeBite’s installation directory open
SnakeBite.exe. - Click Next and locate the game’s
mgsvtpp.exefile within the game’s installation directory to confirm where to install SnakeBite to. - Either agree or skip creating a backup of the original game files.
- Click Done.
Viewing all file extensions in Windows
To more easily distinguish all file types we’re dealing with it’s recommended to disable the Windows setting that conditionally hides filetypes.
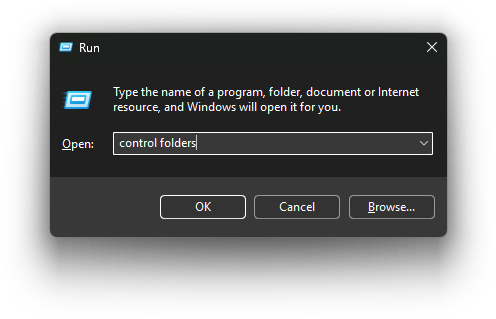
- Open Run dialog by pressing
Win+Rhotkey. - Type
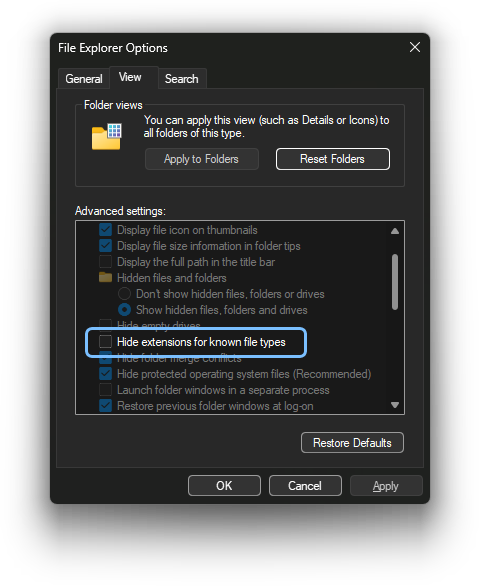
control foldersand pressEnter. - In the File Explorer Options window click the View tab and scroll down to the Hide extensions for known file types and uncheck it to disable the setting.
- Then press OK.
Unpacking the game files
We’ll be using one of File Monolith’s included tools, Archive Unpacker for this.
Show steps
-
First think about where you want the unpacked game files to be stored and create a new directory there. Eg:
C:\Modding\MGSV\TPP\Unpacked.You’ll need around 6GB of free space for the files we’ll be unpacking. It’s much faster to unpack to an SSD if you have the free space.
-
Then take a note of the path where the game is installed.
- Check out this section above for how to determine this if you haven’t already.
-
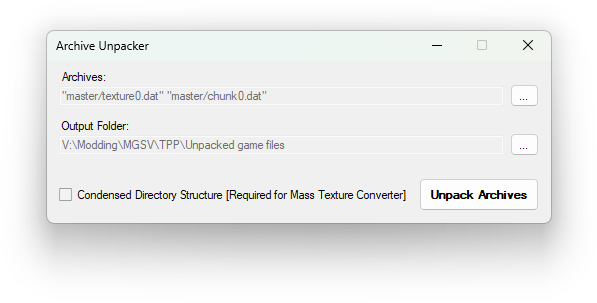
Open File Monolith’s
Archive Unpacker.exeand beside the Archives field click the...button.-
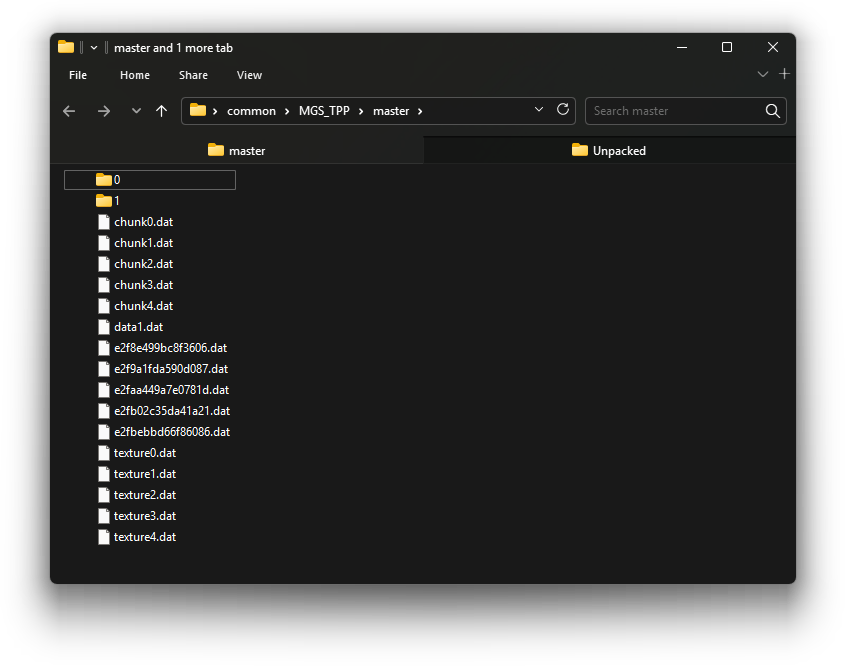
In the new window that popped up navigate to the game’s
MGS_TPPdirectory and within it open themastersub-directory. You’ll see a bunch of DAT (data) files. -
Hold the
Ctrlkey down and select both thechunk0.datandtexture0.datfiles then press the Open button to confirm. These two DAT files contain the relevant arm archives/textures.
-
-
Next click the Output Folder’s
...button and select the directory you’ll be unpacking the game files to. -
Uncheck the Condensed Directory Structure checkbox and then press Unpack Archives to begin the unpacking.
The reason for unchecking this option for this guide is because it will then auto unpack the necessary archive that we need for the arm. Otherwise it won’t and we’d need to use a tool (for FMDL modding: GzsTool or for PFTXS modding: AutoPftxsTool) to manually unpack it, so this saves some extra steps.
However if you’re intending to convert all the game’s textures at once to DDS (useful for general FMDL Studio 2 use or finding specific textures visually and easily) then this setting needs to be left checked in order to extract all the game’s texture files to a consistent structure. This isn’t something needed for the specific steps in the guides here though.
Finding the model and texture files
The game uses archive formats to store models and sometimes its texture files. The bionic arm model (an FMDL file) can be found within an FPK (Fox Package) archive file, while all the texture files can be found standalone (usually refered to as ‘loose’).
Not all textures in the game can be found all loose like the bionic arm textures are. Often you’ll find the metadata file (
.ftex) + smallest size version of the texture (.1.ftexs) exclusively within PFTXS archives. However for very common items such as Snake’s assets the complete set of related texture files can be found loose. You can read more about this here.
Show steps
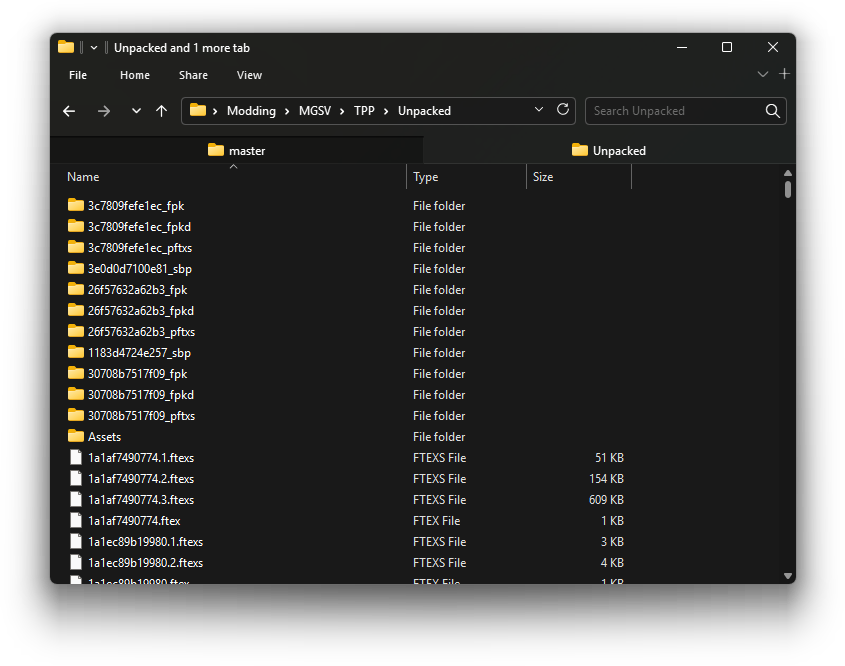
The arm model we want has already been auto unpacked from the FPK archive it was contained within by Archive Unpacker (turning it from .fpk file to an _fpk directory), at the following path within our unpacked game files directory:
Assets\tpp\pack\player\fova\plfova_sna0_arm0_v00_fpk\Assets\tpp\chara\sna\Scenes\sna0_arm0_cov.fmdl
You’ll notice there’s a nested
Assetswithin the parent one. This is just due to how the game optimizes things to load. You’ll see a similar path structure when unpacking any archive from the game.
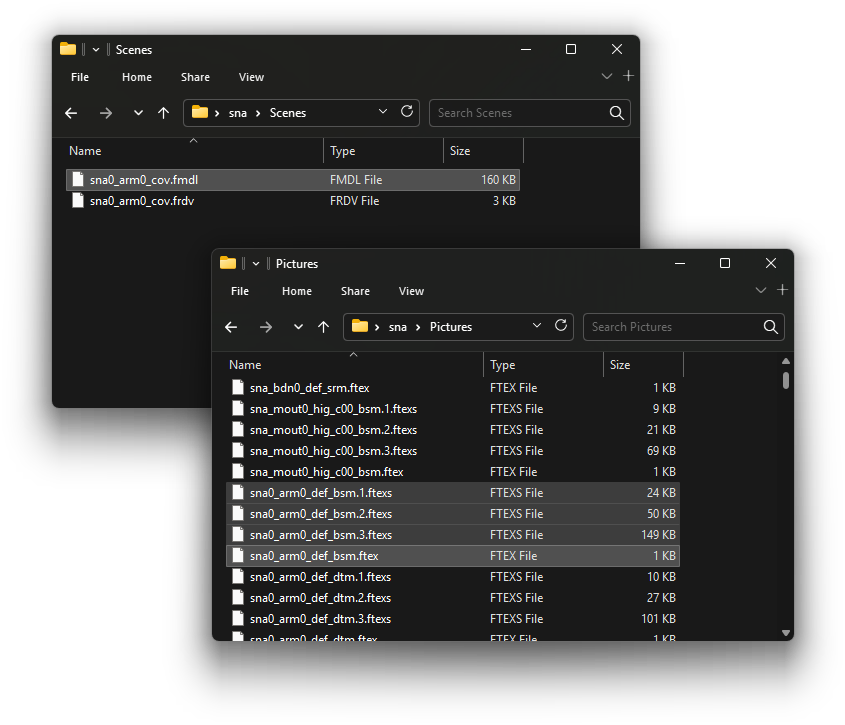
While the texture files we need are located at the following paths:
Assets\tpp\chara\sna\Pictures\sna0_arm0_def_bsm.ftex
Assets\tpp\chara\sna\Pictures\sna0_arm0_def_bsm.1.ftexs
Assets\tpp\chara\sna\Pictures\sna0_arm0_def_bsm.2.ftexs
Assets\tpp\chara\sna\Pictures\sna0_arm0_def_bsm.3.ftexs
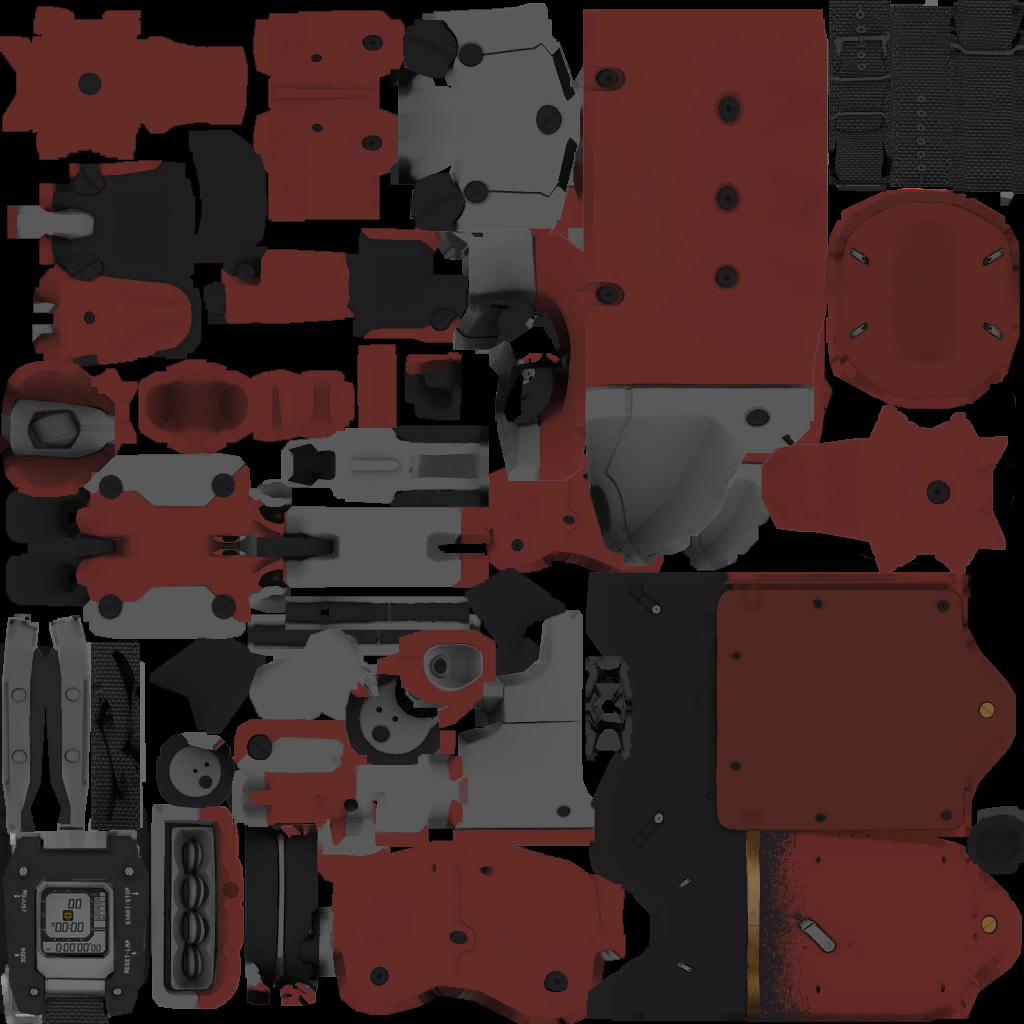
These are the base/albedo color texture. The arm material is using multiple different textures to look how it does but this guide is focusing on just the base color map.
If you’re curious check out the FTEXS page for more in-depth details about the format. The .ftex file stores metadata information about the texture while the .ftexs files contain the actual image data.
Whenever retexturing we always need the FTEX file + all the related FTEXS files in order to convert to a usable texture format for image editing. Most textures, except if they’re small in resolution, will have three related FTEXS files.
Tip: how to generally find related texture files
There are a couple ways to find related texture files for a model:
- By looking at the unpacked game files and searching for PFTXS archive or loose textures that match the same base filename as the FPK or FMDL file. In our case
sna0_arm0. The Things Code page lists the abbreviations the game uses for various characters/objects.- Or similarly by searching File Monolith’s
TppMasterFileList.txtthat includes a (giant) list of unpacked game file paths.Tip: the Windows search tool Everything is useful for quickly finding files, moreso than the native Windows search.
- Or similarly by searching File Monolith’s
- If you have FMDL Studio 2 installed for Unity the FMDL can be imported then by selecting the mesh a list of all related textures will appear in the right side panel and double-clicking the texture square will list what texture path is used. Mostly useful if already using FMDL Studio 2 for modding.
Setting up the mod directories
Our final mod will have two directory structures within the same parent directory:
Assets\tpp\Mods\Custom\BionicArmVariantsAssets\tpp\pack\player\fova\plfova_sna0_arm0_v00_fpk\Assets\tpp\chara\sna\Scenes\
The first path above is where we’ll be placing our modded texture files, while the second path is where the modded arm model will go and is a recreation of the original game structure seen in the original unpacked game files.
So let’s create them and also copy in the original model and texture files. Follow either the text steps or the video below.
Show steps
Creating the directories
-
Make some new directory on your computer where you’d like your mod project to be. Eg:
C:\Users\Username\Bionic arm mod - Within it create a new sub-directory named
Modded. - Open
Moddedand select File Explorer’s path addressbar (the textbox to the left of the searchbox). - Type
cmdand press Enter. This will open a command line at the current location. -
Copy the following command then paste it in the CMD window by right-clicking in the window once:
mkdir "Assets\tpp\Mods\Custom\BionicArmVariants"Note: the
Custompart of the path is intended to be replaced with your username. However you can customize the modded texture path any way you want (for more info see the Important things to know about paths in the spoiler below). - Then press Enter. This creates all the sub-directories in one action.
-
Next do the same but for the following command:
mkdir "Assets\tpp\pack\player\fova\plfova_sna0_arm0_v00_fpk\Assets\tpp\chara\sna\Scenes\"
Done! Now we have both required directory paths in the Modded directory.
Copying the files to them
Lastly copy in the model and texture files:
- Copy those
sna0_arm0_def_bsmFTEX and FTEXS files from the original unpacked game files, listed in the earlier section, to theBionicArmVariantsdirectory you just created. - Then copy the
sna0_arm0_cov.fmdlfrom the original unpacked game files to theScenesdirectory you just created.
You might be wondering why we don’t just use the original path of the textures for our
Moddedcopy. This is because when we get to editing the FMDL model file it needs to point to a custom path not used by the vanilla game files in order to work. So for this guide I’ve chosen the path above.
Video
Important things to know about paths
-
Wherever you decide to have your
Moddeddirectory just remember to not place them too deeply in the drive, since Windows File Explorer still has a ~260 character path limit and we want to avoid exceeding that length to avoid issues.- Eg:
C:\Users\Username\Bionic arm mod\Moddedwould be a decent path length.
- Eg:
-
For the path replacer script you can create a different custom directory structure if you want for the modded texture, it just requires the texture be placed anywhere within at least the
Assetsdirectory.Note: this is different from how FMDL Studio 2 handle paths. With FMDL Studio 2 it requires custom texture paths be within
Assets/tppor else the texture won’t show up in-game. -
MGSV is case-sensitive with its directories and filenames. So
assetsis different fromAssets. -
Valid characters for MGSV file paths are: alphanumeric characters (A to Z, 0 to 9). Underscores (
_) and hyphen (-) characters are also valid but no spaces are allowed.This only matters for the MGSV file paths themselves (eg: beginning with
Assets) not any parent Windows path outside them. -
Paths in MGSV files use forwardslashes rather than backslashes. However the path replacer script auto-corrects this and FMDL Studio 2 handles formatting paths behind the scenes to be correct, so it’s not something you normally have to think about unless editing paths in other types of files.
Editing the texture file
This is where we’ll do the first modding, by converting the original texture so it can be opened in an image editor, editing it, then converting it back to the game’s texture format.
Show steps
Converting to DDS
- First convert the FTEX to a DDS file by dragging only the
sna0_arm0_def_bsm.ftexfile by itself ontoFtexTool.exethat you downloaded earlier. A.ddsfile will appear beside it.- If you’re unsure check out this wiki page that has a video showing how to convert using FtexTool.
- Once you have a converted DDS file delete the sibling
.ftexand.ftexsfiles that you copied since we no longer need them.
Editing the texture
- Next check out this page if you haven’t already, for a list of various image editor plugins and tools you can choose from in order to import and export the DDS file.
There are DDS plugins for a variety of programs so it’s not an exhaustive list but pick something you’re comfortable with.
- Once you have the texture image opened in your image editor adjust the original texture to be darkened. There are multiple ways to accomplish this depending on the image editor used, so this aspect won’t be covered here.
Using the red color channel for masking (isolating areas) is useful, or you could just crank down the saturation.
In my case I also adjusted the watch’s LCD screen, similar to inverting the LCD display in real life by adjusting the polarizer film.
- When you’re happy with the adjustments export to a new DDS file (eg: overwriting the original DDS you converted).
Since the texture doesn’t have any alpha channel the format you’ll want to save the DDS as is BC1 (aka DXT1), with mipmaps enabled.
Converting back to FTEX
- Convert the modded texture DDS file back to to FTEX/FTEXS by dragging the
.ddsfile ontoFtexTool.exe. An FTEX and related FTEXS files will appear beside it.- You can refer to the same wiki page for a video if you’re unsure.
- Keep the
.ddsfile if you’re following the FMDL Studio 2 guide, otherwise you can delete it if you want.
Packaging and installing the mod
Packaging the mod with MakeBite
Show steps
-
From the SnakeBite tool directory that you unzipped earlier open
makebite.exe. -
In the right half of the program, under Mod Files, click the
...button and navigate to theModdeddirectory that was created and click the Select Folder button to confirm.- After this you’ll see some files appear in the right side of MakeBite. These are the files we modded being detected.
Note: (for PFTXS Only guide) the MakeBite included with the latest SnakeBite version at the time of writing (0.9.2.2) doesn’t display loose
.ftexsfiles in the Mod Files panel of the GUI. However they’re still packaged during build.
- After this you’ll see some files appear in the right side of MakeBite. These are the files we modded being detected.
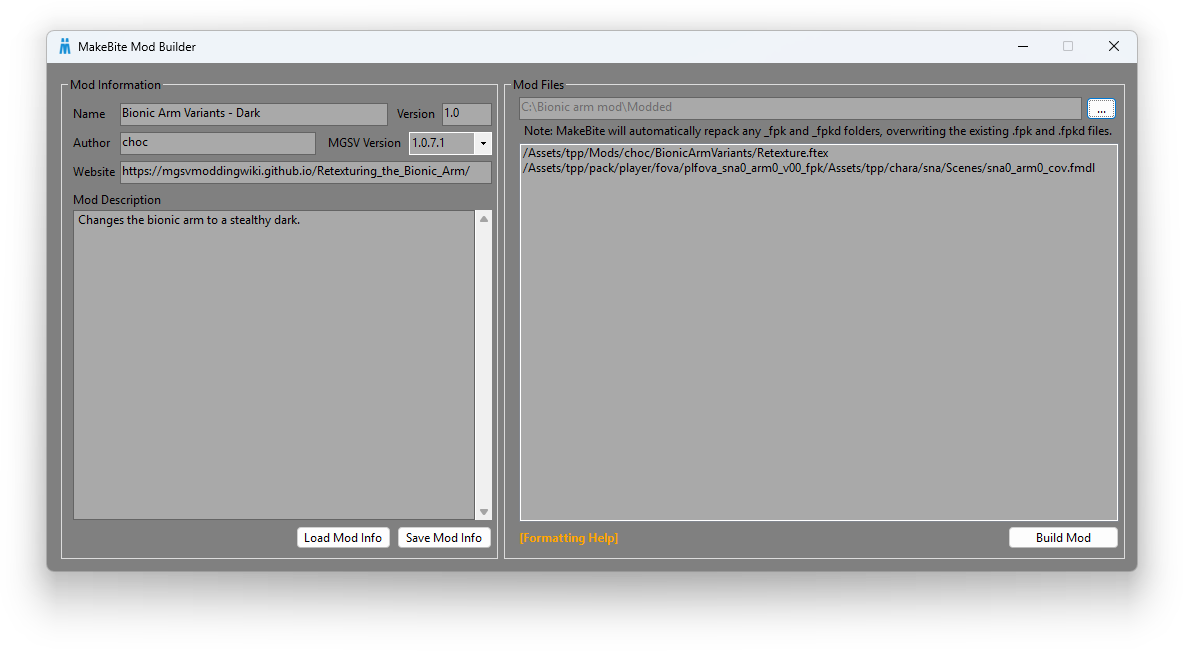
- In the left half fill out the mod information like the name of the mod, the version, etc. Here are some example values:
- Name:
Bionic Arm Variants - Dark - Version:
1.0 - Author:
choc - MGSV Version:
1.0.7.1 - Website:
https://mgsvmoddingwiki.github.io/Retexturing_the_Bionic_Arm/ - Mod Description:
Changes the bionic arm to a stealthy dark.
The MGSV Version field is the minimum game version the mod will work with. Since this is a basic mod it’s compatible with older game versions but if ever unsure you can just leave it on the default value.
- Name:
- When complete click the Build Mod button in the bottom-right of the window and select a directory to save the resulting
.mgsvarchive to.
Installing the mod
- Open
SnakeBite.exeand click the MODS button. - On the left side click the Install .MGSV Files button and navigate to and select the
.mgsvpackage we just created. - In the pop-up window click Continue Installation then OK when prompted.
If there are any conflicts with existing mods you have installed SnakeBite will warn you here.
The mod is now ready to see in-game!
Tip: SnakeBite
.mgsvpackages are just renamed.zipfiles. You can open them in a zip program to view their content.